not much time spent on the cars this weekend, though what I did do seems to have been very fruitfull.
For a year or so now the Lotus has seemed a little down on power when accelerating and has a slight stumble when you step in at lowish rpm, I have already replaced most of the ignition parts with no result and re-set the valve clearances, so I now moved to the carbs, On the dellortos you can remove most of the jets with out taking them appart, as idle and steady state driving were fine I majored on the progression holes and the accel pump jets, I removed the plugs for the progression holes and blew them out with an airline (all looked clear anyway) then removed the accel pump jets the front 3 came out and looked fine, on the 4th one though when I cracked the cap fuel started running out, on inspection the O ring had started to break up and parts of it semed to be blocking the pump delivery channel, a quick blow out with the airline and a new o ring has transformed the way it drives, I'm even using it in the rain today.
I have now ordered some viton rings to replace them all with.
kevin s's blog
Re: kevin s's blog
sounds like a result there kevin.
kev
kev
Re: kevin s's blog
For the last week I have been using the Lotus every day, this inspired me to do some of the little jobs which I have been putting off for years, the main ones are repairing the lower dash trims and tidying up the vinyl around the screen and make the glove box open properly.
Firstly I tackled the glove box lid , taking a bit off one corner made it fit much better and open properly, at the same time I also re-fitted the glove box light switch which had fallen off and was hanging by it's wire.
The lower dash trims are vinyl stuck over a vacuum forming, the vac formings have disentigrated.
.
So I made a new one out of thin alloy sheet.
Then re used the original covering to re-cover it.
just need to re-fit the map light and use another piece of alloy to make the part which goes under the dash, then onto the other side. the only problem at the moment is getting the oatmeal vinyl to cover it, the only place I can find works out £40 for 1 metre, so it may just end up black.
Unfortunatelly after all this attention it rewarded me with a flat tyre so I will be back inthe landie tomorrow. The TR alternator has arrived but I need to bore the pulley out to fit it before it can go back on the car so that is also off the road!
Firstly I tackled the glove box lid , taking a bit off one corner made it fit much better and open properly, at the same time I also re-fitted the glove box light switch which had fallen off and was hanging by it's wire.
The lower dash trims are vinyl stuck over a vacuum forming, the vac formings have disentigrated.
- 20150520_121936 small.jpg (39.23 KiB) Viewed 1799 times
- 20150520_122309 small.jpg (40.79 KiB) Viewed 1799 times
So I made a new one out of thin alloy sheet.
- 20150520_122040 small.jpg (42.1 KiB) Viewed 1799 times
- 20150520_125257 small.jpg (33.58 KiB) Viewed 1799 times
Unfortunatelly after all this attention it rewarded me with a flat tyre so I will be back inthe landie tomorrow. The TR alternator has arrived but I need to bore the pulley out to fit it before it can go back on the car so that is also off the road!
Re: kevin s's blog
replaced backing to the dash trim on the other side with a alloy structure as well now, before:
After
Just need to find a nut for the trip re-set cable.
While am fixing odds and ends I took a look at the heater fan which only works on the high speed, turns out as expected the resistor has failed, searching through my box of electrical parts I found this which seems to work:
- 20150522_121642small.jpg (104.78 KiB) Viewed 1785 times
- 20150524_191633small.jpg (69.32 KiB) Viewed 1785 times
While am fixing odds and ends I took a look at the heater fan which only works on the high speed, turns out as expected the resistor has failed, searching through my box of electrical parts I found this which seems to work:
- 20150524_191654small.jpg (104.04 KiB) Viewed 1785 times
Re: kevin s's blog
The new alternator for the TR turns out to have a 17mm shaft, problem is the old one and hence the pulley had a 15mm shaft.
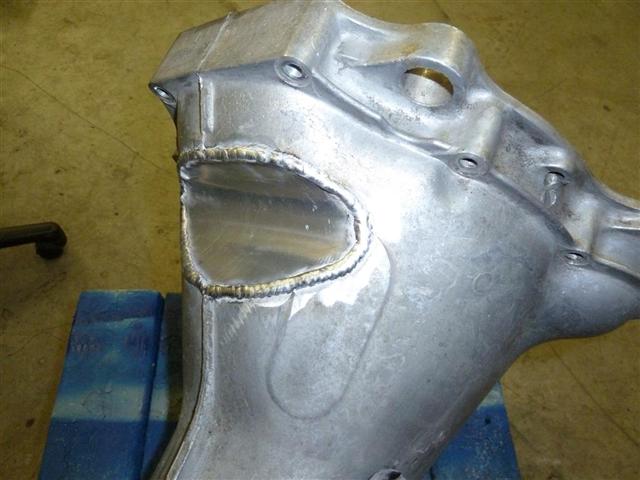
So I needed to get to work on the lathe, boring out the pulley only took a few minutes, but while I was at it I did the turning required to fit the mx5 box to the minor, firstly I enlarged the hole in the centre of the 1275 marina flywheel and the recess for the crank flange so it fitted on the minor crank.
I then urned up a bush to centre the pilot shaft to the crank, eventually I wil get some bronze to make one but for now alloy will do.
the flywheel now bolts to the engine (still need to drill 4th bolt hole).
the only problem is the flywheel fouls the oil pump cover so I see a bit more machining coming up.
So I needed to get to work on the lathe, boring out the pulley only took a few minutes, but while I was at it I did the turning required to fit the mx5 box to the minor, firstly I enlarged the hole in the centre of the 1275 marina flywheel and the recess for the crank flange so it fitted on the minor crank.
- 20150524_132455_4small.jpg (108.28 KiB) Viewed 1784 times
- 20150524_143338small.jpg (107.91 KiB) Viewed 1784 times
- 20150524_191523small.jpg (92.78 KiB) Viewed 1784 times
- 20150524_191610small.jpg (97.56 KiB) Viewed 1784 times

Re: kevin s's blog
It's interesting, this whole business of fitting Japanese MMUs into Minors and not having them catch all over the place!
Does the Mazda gearbox clear the steering rack, or do you need to lower the engine & gearbox as would be the case with a BW65 conversion?
 Also, if you know of anyone who has an automatic MX5; is the bellhousing on its transmission as shallow as that on the manual?
Does the Mazda gearbox clear the steering rack, or do you need to lower the engine & gearbox as would be the case with a BW65 conversion?
J
"Home is where you park it", so the saying goes. That may yet come true..
"Home is where you park it", so the saying goes. That may yet come true..
Re: kevin s's blog
I have an auto MX5 john, what do you need to know?JPB wrote:It's interesting, this whole business of fitting Japanese MMUs into Minors and not having them catch all over the place!
Does the Mazda gearbox clear the steering rack, or do you need to lower the engine & gearbox as would be the case with a BW65 conversion?
Kev
Re: kevin s's blog
See the rear view of the Minor engine in Kevin's photo? Immediately above the manual flywheel seen on that engine, what is the depth of the bellhousing on the automatic MX5?
I'm asking because if the torque converter on the Mazda is any deeper than the flywheel - at the point where the upper bit of the Minor engine's backplate mating flange rises toward the head - then the Mazda's bellhousing wouldn't clear the Minor steering rack which, in the stock - manual - installation in a Minor sits only around 4 1/2" behind that area of the block. Manual gearboxes, such as the commonly fitted Ford ones, can have a notch made to clear the rack and as Kevin is fitting the Mazda gearbox, presumably it too can be modified to fit up into that restricted space. However, the Borg Warner 65 transmission - that would otherwise be a straightforward fit to the back of an A series with a flex plate - cannot be cut that way as even the smallest TC available for it, a 1300cc Marina/Ital one, is too deep at that point which is why I was looking at the Datsun-built, 5 bearing take on the A series, because its auto option has a deeper, but smaller in O/D TC which fits under the rack and allows the Minor engine to be fitted at its usual height (usual compared to a UK A series with ribbed case Minor gearbox).
So you see, if the Mazda's manual gearbox fits there, then I'm thinking that it's worth asking whether the auto would also be adaptable to fit, even if it, like the Ford and Toyota options, has to have this done to it:
I have a vague recollection of an automatic MX5's bellhousing being a fat wee thing that may be suitable but hadn't considered that option before Kevin posted the picture of the Minor engine, my apologies for asking this O/T, Kevin.
J
"Home is where you park it", so the saying goes. That may yet come true..
"Home is where you park it", so the saying goes. That may yet come true..
Re: kevin s's blog
I am expecting to notch the bell housing as shown above, not sure wheather i will just leave it open or weld a piece in, the possibility of distortion worries me. The other potential issue it size of the marina clutch,to clear this it may end up slightly lowered and it may also be pushed to the left to clear the starter motor anyway. It will be pretty easy to modify the front brackets if required, I did something very similar on the tr when i put the v8 in.
i also need to look at moving the gearstick forward or cutting the floor.
i also need to look at moving the gearstick forward or cutting the floor.
Re: kevin s's blog
Rather than cut something, would a S2 tunnel not do the same job? They came with a longer gear lever that entered the tunnel further forward, I believe that the GRP tunnels are still available and they're actually cheaper than steel ones in spite of their superior insulation abilities, to say nothing of how much stronger they are in all sorts of ways.:

Unscrew one, fit the other, the captives appear to be in all of the same places in the floor around the tunnel.
Thanks for the thoughts on the gearbox. One thing that I'm trying to avoid is cutting the centre crossmember, which was rubbing on the underside of the propshaft on the Marina-engined Minor auto that I drove, such was the extent to which the engine & box had to be set lower.
Regarding the plate on the bellhousing; it's very unlikely that you'd distort that, it's so thick compared to the plate, or you could simply fit a piece of a juice tin and bond it on with a few screws for support.
Unscrew one, fit the other, the captives appear to be in all of the same places in the floor around the tunnel.
Thanks for the thoughts on the gearbox.
Regarding the plate on the bellhousing; it's very unlikely that you'd distort that, it's so thick compared to the plate, or you could simply fit a piece of a juice tin and bond it on with a few screws for support.
J
"Home is where you park it", so the saying goes. That may yet come true..
"Home is where you park it", so the saying goes. That may yet come true..