kevin s's blog

Post pictures and stories about your cars both present and past. Also post up "blogs" on your restoration projects - the more pictures the better! Note: blog-type threads often get few replies, but are often read by many members, and provide interest and motivation to other enthusiasts so don't be disappointed if you don't get many replies.
Message
Author
kstrutt1
Posts: 516
Joined: Sat Oct 22, 2011 8:55 pm
Location: essex

Re: kevin s's blog

#221 Post by kstrutt1 »

Got my blasting cabinet working today then used it to blast up a couple of the panels I had removed from the minor.
rps20150125_192455.jpg
rps20150125_192455.jpg (87.13 KiB) Viewed 1783 times

Beforehand both were heavily rusted, the pillar, as well as the area at the bottom which needs replacing, has a few pin holes which I will weld up but both look recoverable and then after a coat of paint they can go back on which will allow the door to be fitted and the rear wing finished.
kstrutt1
Posts: 516
Joined: Sat Oct 22, 2011 8:55 pm
Location: essex

Re: kevin s's blog

#222 Post by kstrutt1 »

Been busy on the minor for the last week or so door pillar fitted:
rps20150214_231134.jpg
rps20150214_231134.jpg (48.32 KiB) Viewed 1757 times
Return panel under roof replaced all the way around the door:
rps20150214_231441.jpg
rps20150214_231441.jpg (30.56 KiB) Viewed 1757 times
rps20150214_231508.jpg
rps20150214_231508.jpg (39.57 KiB) Viewed 1757 times
Repairs made to some holes and seal flange around door.
rps20150214_231338.jpg
rps20150214_231338.jpg (44.51 KiB) Viewed 1757 times
Tried the door on but it needs some shims under the hinges ( I deliberately welded pillar on slightly forward ) once this is done I can move onto replacing the bottom of the rear wing and fitting the gutters.

In the end today the weather was so good I took the tr out for a blast with the roof down instead of doing anything else.
kstrutt1
Posts: 516
Joined: Sat Oct 22, 2011 8:55 pm
Location: essex

Re: kevin s's blog

#223 Post by kstrutt1 »

I have spent ages trying to get the door to fit, ultimately I have concluded the door and it's apperture are slightly different shapes, basically if I get the front high enough to give an even gap at the rear the top front of the door hits the A pillar, it may bedthat was how it was built as I have seen others which look similar. Now I have it set up so the front is a good fit to the A pillar, the top of the rear is the right height, the seals fit, and it shuts well but the gap up the back tapers, so the plan is now to cut the rear wing vertcally push it rearwards and re weld to give a perfectly even gap, the lower part of the wing can then be re-fitted.
rps20150228_220821.jpg
rps20150228_220821.jpg (46.79 KiB) Viewed 1727 times
rps20150228_220911.jpg
rps20150228_220911.jpg (39.43 KiB) Viewed 1727 times
!
I also took the mx5 to work the other day to give it a bit of a run, when I got there I noticed the smell of coolant, turns out the plastic radiator header tank has a crack in it, in fact looking at it closely it is covered in surface cracks, so a new one has been ordered (very reasonable £36) and it will be fitted at the weekend. It does make you wonder with all the plastics used in the engine compartments of modern cars if there will be any future classics ( or perhaps we will just be able to print replacements!).
kstrutt1
Posts: 516
Joined: Sat Oct 22, 2011 8:55 pm
Location: essex

Re: kevin s's blog

#224 Post by kstrutt1 »

Cut the minor rear wing and welded back up to sort out the gaps.
rps20150306_222840.jpg
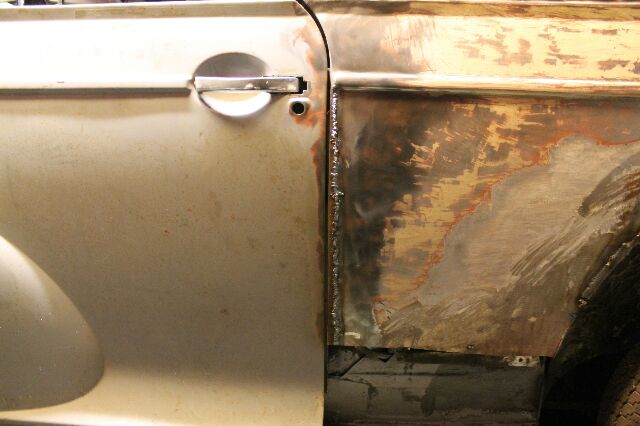
rps20150306_222840.jpg (39.9 KiB) Viewed 1699 times
Then I moved onto the lower part of the bodyside, a new panel was fabricated and butt welded in place.
rps20150306_222924.jpg
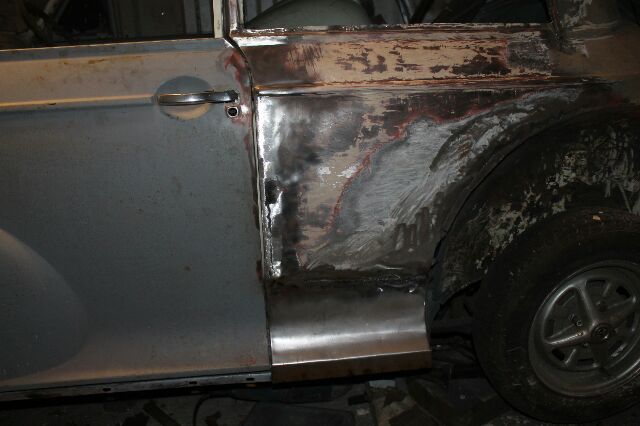
rps20150306_222924.jpg (39.3 KiB) Viewed 1699 times
Next up is to make the closing panels and sort the fit to the rear wing out.

I also improved the landrover heater, I noticed in the week that if you pushed on it the fan sped up( its one of the round smiths ones) adding an extra earth massively increased the fan speed, it obvoiusly was not earthing through the case properly.


I also serviced the elan, I used some classic oil, it is even green like the old duckams! Found a couple of things to do, the. 1 year old top ball joint gaiters are falling to bits and the front brake discs are getting grooved which probably explains the judder.

We took advantage of the weather to do some gardening so the mx5 radiator did not get changed, that will have to wait until next weekend, it is only a small weep at the moment though.
kstrutt1
Posts: 516
Joined: Sat Oct 22, 2011 8:55 pm
Location: essex

Re: kevin s's blog

#225 Post by kstrutt1 »

Spent saturday afternoon on the mx5, fitted a new radiator as the plastic header tank had cracked, while it was out the fan shroud was painted (surface rust) as were a couple of brackets for the ac pipes.

The exhaust heatsheild was removed and painted with silver VHT paint and the oil changed. I also checked the diff oil level but could not get the filler plug out of the trans, I will have to make a tool which grips it better (14 mm male square head), otherwise everthing looks fine, I plan to tidy the engine compartment up a bit more and sort out the poorly fitted wing over the summer but nothing to urgent.
Attachments
rps20150315_213255.jpg
rps20150315_213255.jpg (64.15 KiB) Viewed 1671 times
rps20150315_213100.jpg
rps20150315_213100.jpg (52.36 KiB) Viewed 1671 times
rps20150315_213212.jpg
rps20150315_213212.jpg (61.77 KiB) Viewed 1671 times
kstrutt1
Posts: 516
Joined: Sat Oct 22, 2011 8:55 pm
Location: essex

Re: kevin s's blog

#226 Post by kstrutt1 »

Almost finished the rear quarter on the minor now, just need to clean the welds up, add a weldnut for the wing and a flange for the trim inside then it is on to the gutters.

On the others the tr is working fine, the landie runs well on lpg but has a fuel delivery problem on petrol which I need to sort out also it has a slight knock from the front probably the damper bush advisory from the last mot.

The mx5 has developed a squeal from the clutch as the clutch slips, probably the pilot bearing so I guess a new clutch is on the way.

Kevin
Attachments
rps20150326_213459.jpg
rps20150326_213459.jpg (46.33 KiB) Viewed 1633 times
rps20150326_213342.jpg
rps20150326_213342.jpg (55.11 KiB) Viewed 1633 times
rps20150326_213245.jpg
rps20150326_213245.jpg (52.17 KiB) Viewed 1633 times
kstrutt1
Posts: 516
Joined: Sat Oct 22, 2011 8:55 pm
Location: essex

Re: kevin s's blog

#227 Post by kstrutt1 »

Been a busy weekend but mostly on the house and other peoples cars, my nieces ka failed tge mot on rust close to the seat belt, knowing how well these rust I was expecting a mess, fortunatelly it is actually pretty solid, the issye was untreated stone pecking rusting from the outside in, in the end it needed 4 patches each about 2 inches square, then cleaning up and giving a coat of cstone chip.


I did manage to replace the front discs and ball joints on the lotus, the ball joints were only a year old and already the gaiters had split and one had some play, the discs were causing judder, a quick test drive and all seems well.
Attachments
rps20150407_064227.jpg
rps20150407_064227.jpg (50.97 KiB) Viewed 1598 times
rps20150407_064122.jpg
rps20150407_064122.jpg (50.33 KiB) Viewed 1598 times
rps20150407_064045.jpg
rps20150407_064045.jpg (28.92 KiB) Viewed 1598 times
kstrutt1
Posts: 516
Joined: Sat Oct 22, 2011 8:55 pm
Location: essex

Re: kevin s's blog

#228 Post by kstrutt1 »

Both the tr and landie need mots on the next couple of weeks, there are no obvoius issues with tr but there is a bit of a list with the landie so I started looking at it tonight.

1. cracked rear light, found one in my spares box and fitted it.

2. Increasing play in the steering - turned out the relay was moving, nipped up the top bolts all fixed.

3. engine oil leak which was getting worse (6 inch dia patch under it last night). - the sump bolts had loosened, nipped up bolts no more leaks.

4. brakes work ok and will meet mot requiement easily but pedal travel could be less - adjusted brakes, better but still not as good as they have been, might try reverse bleeding with a syringe.

5. hand brake not very good, simple adjustment sorted this.

6. knock from rear - bottom damper bushes worn, I have some poly ones somewhere but can't find them !

So all in all all a good result, just need to find /fit the damper bushes and have a go at bleeding the brakes in the next week or so and it should be ready to go.
kstrutt1
Posts: 516
Joined: Sat Oct 22, 2011 8:55 pm
Location: essex

Re: kevin s's blog

#229 Post by kstrutt1 »

Spent the last few days under the mazda, it started making a horrible screaching whenever the clutch was depressed, turned out to be a seized pilot bearing, so ended up fitting a new clutch as well. To get better access I also removed the cam sensor which was leaking oil and needed a new o ring anyway, to get this off it is a lot easier to remove the cam cover so I also painted this in black crackle, which with the raised letering polished looks superb.

This started thursday evening and it is all now finished, but I have also decided to tidy up the rhs of the engine compartment which is put to shame by the new shiny parts so most of the ancilary components are removed ready to paint the area.

Also spent this afternoon changing a clutch master cyl on the in laws doblo, fiddly job in the footwell, and managed to put my back out!

Oh and the tr passed its mot on wednesday, landrover next, going to change damper bushes tomorrow if my back allows and it should be ready to go.
kstrutt1
Posts: 516
Joined: Sat Oct 22, 2011 8:55 pm
Location: essex

Re: kevin s's blog

#230 Post by kstrutt1 »

A picture of the painted mx 5 cam cover,
rps20150420_200506.jpg
rps20150420_200506.jpg (67.66 KiB) Viewed 1546 times

This evening I dutifully went shopping at Aldi, and they had these, bluetooth, deckless in car entertainment, all for £20. plan is to fit it to the land rover as the volume knob has packed up.
rps20150420_200553.jpg
rps20150420_200553.jpg (61.75 KiB) Viewed 1546 times
Finally I thought I would share another project I have been working on, a fold flat blast cabinet made from scrap wood and a aggregate bag.
rps20150420_200902.jpg
rps20150420_200902.jpg (44.78 KiB) Viewed 1546 times
It folds to around 4 inches thick so can be hung on any wall/ceiling, the glass screen leaks dust around the edges and will have to be mounted in a stiffer frame but otherwise it seems to work really well.


Kevin
Post Reply