Vulgalour's Vehicles - 10/03 Ignition Switch Woe

Post pictures and stories about your cars both present and past. Also post up "blogs" on your restoration projects - the more pictures the better! Note: blog-type threads often get few replies, but are often read by many members, and provide interest and motivation to other enthusiasts so don't be disappointed if you don't get many replies.
Message
Author
User avatar
JPB
Posts: 10319
Joined: Fri Jan 07, 2011 3:24 pm

Re: '80 & '81 Austin Morris Princess and a '75 Renault 6TL

#381 Post by JPB »

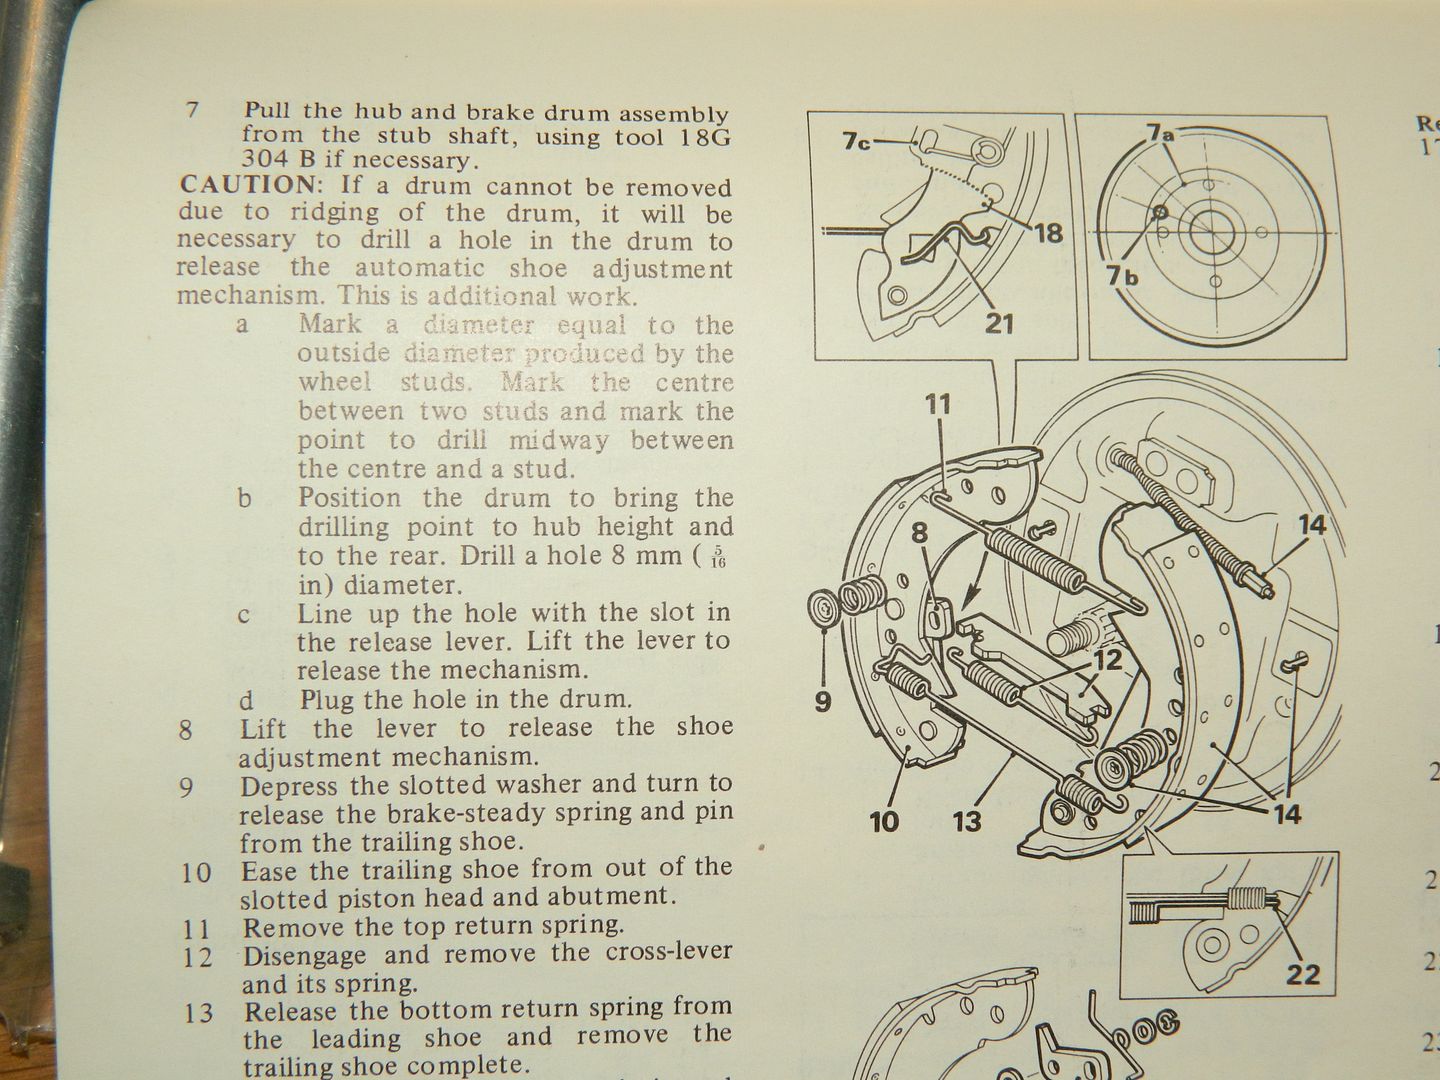
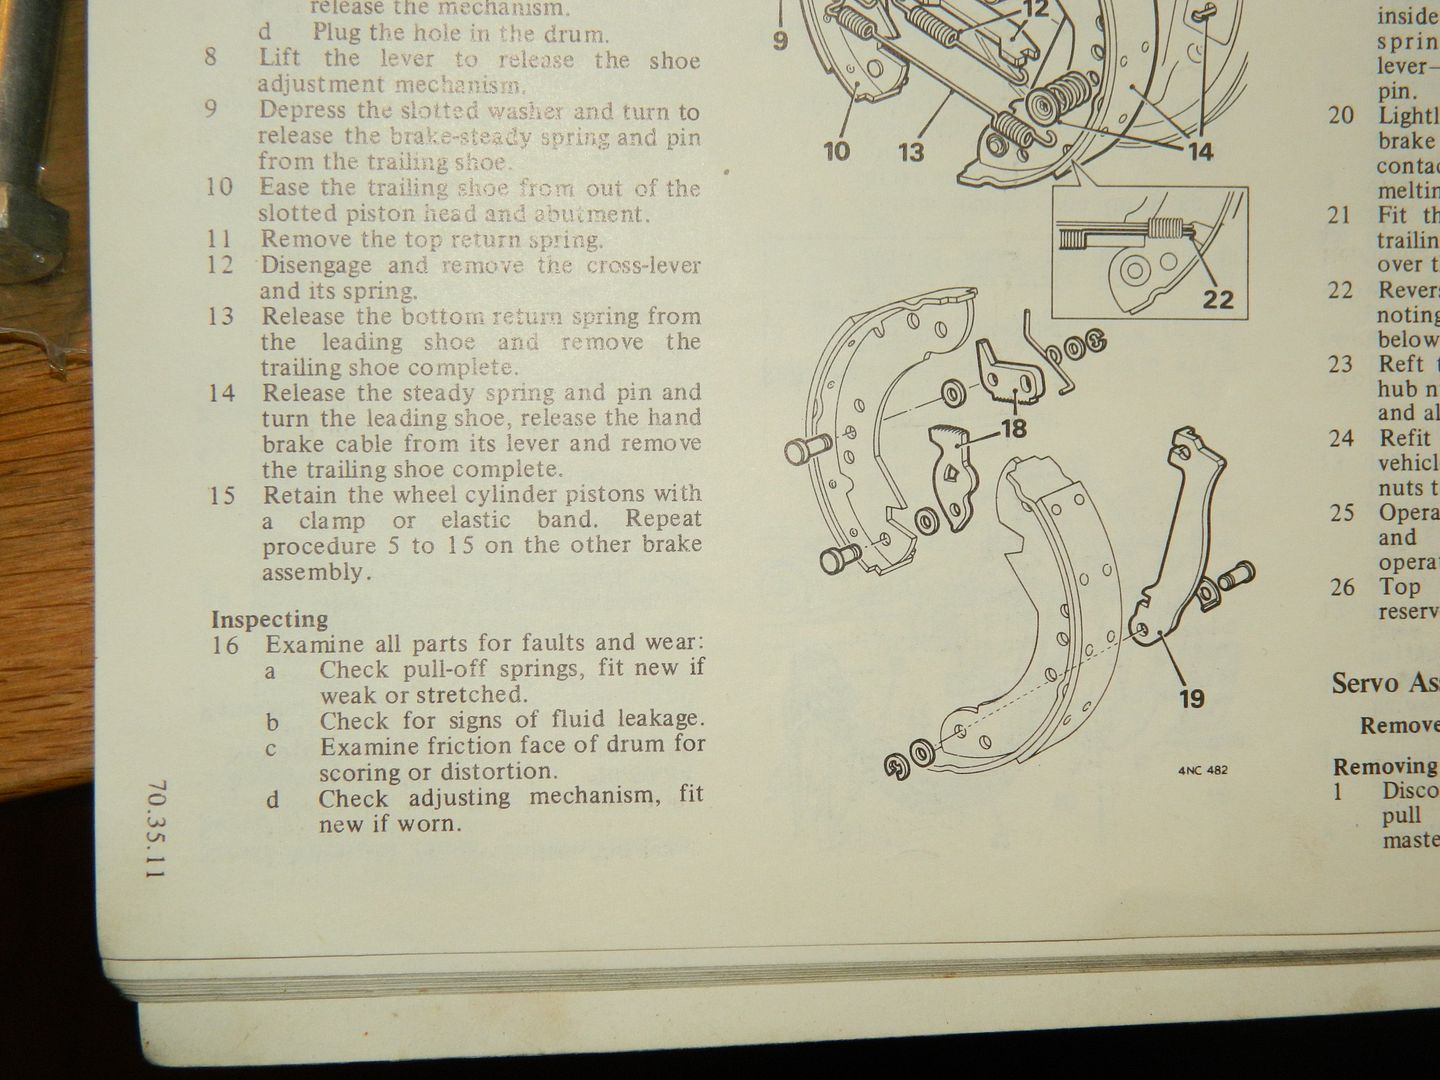
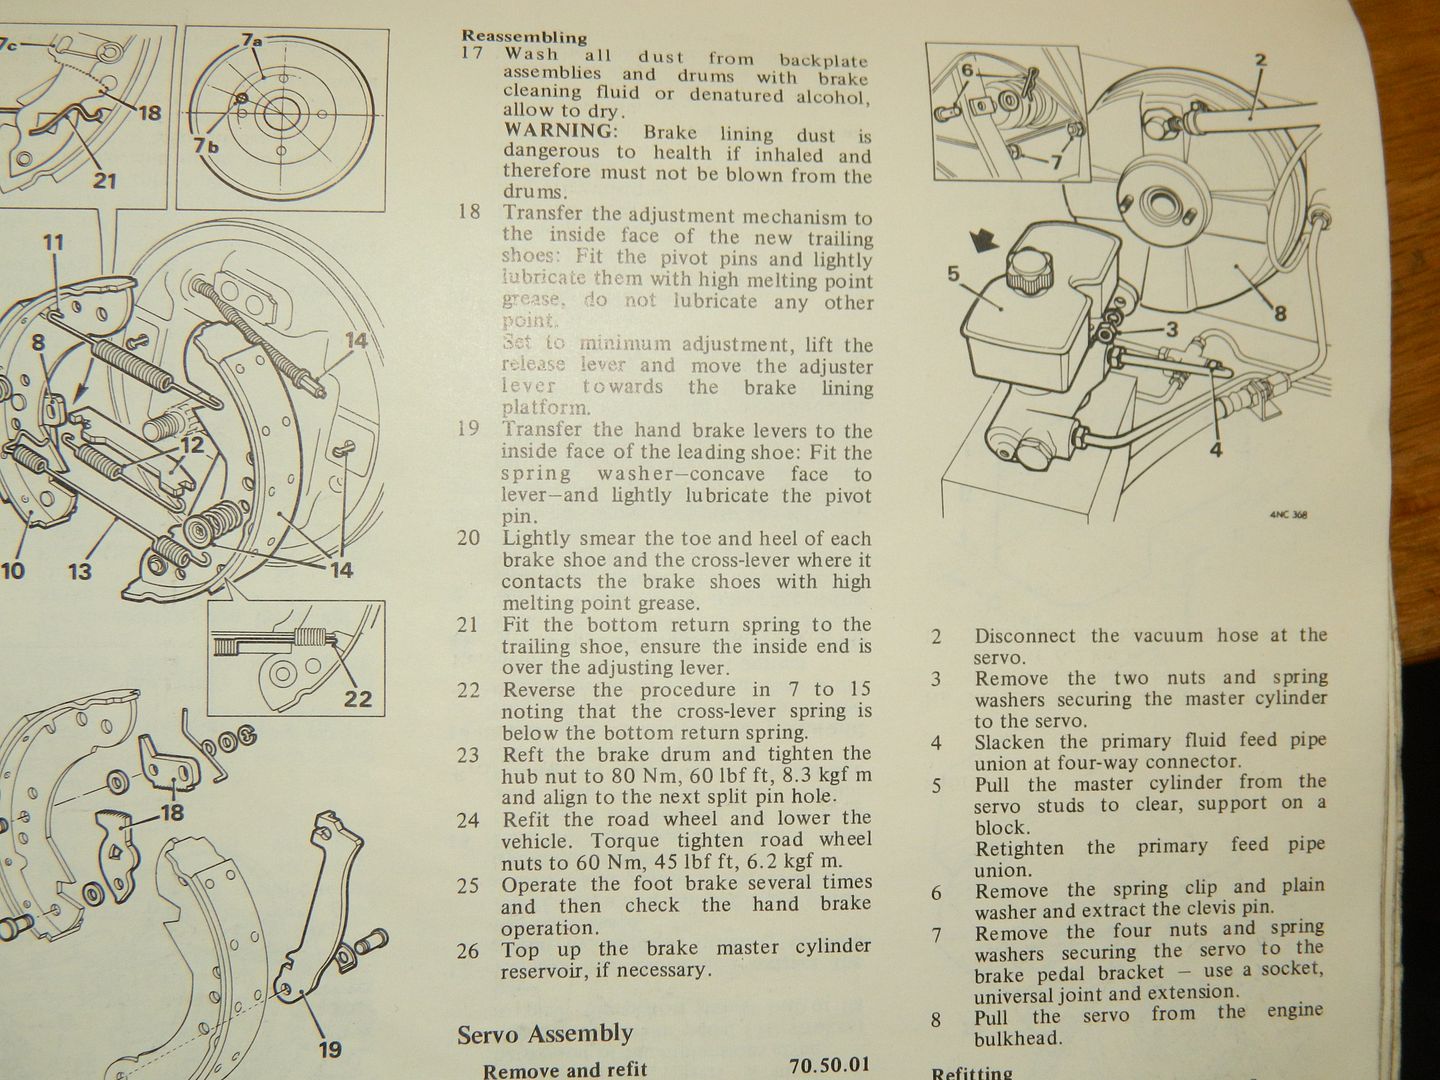
Raymk wrote:Vulgalour, in your 5-12pm post of yesterday (2nd April) you showed a picture of the rear brake assembly and commented that despite adjustment you did not think they were good enough yet. Now it is entirely possible that I have misinterpretted the photo (old eyes!) and British Leyland may indeed have designed the assembly that way, but one of those linings looks back to front. Usually, to get a slight self servo effect from the lining contact area and pivot geometry, the lining area is arranged to assist in the forward direction (i.e. as a leading shoe). The shoe on the right of the photo should surely have the lining nearest the brake piston. Is this possible from the axle shoe set you started with? No offence will be taken if I'm talking rubbish :) . Oh, I really enjoy your Princess exploits and I am looking forward to hearing how the Renault shapes up :thumbs:


Rear brakes should - as Raymk suggested - usually (When the cylinder is a fixed, double ended one as that is then it's almost universally so) have one leading and one trailing shoe to provide sufficient effort for braking when reversing. The rearmost shoe on the backplate shewn seems to have the slot for the end of the parking brake lever at the wrong end and sure enough its lining is leading so perhaps it ought to be the other way up. It's usually harder to get this wrong than to get them right but that certainly could be wrong. I have a manual in my office and am at work on Monday so will look then if nobody steps up before that.
J
"Home is where you park it", so the saying goes. That may yet come true.. :oops:
vulgalour
Posts: 674
Joined: Mon Sep 23, 2013 10:28 pm

Re: '80 & '81 Austin Morris Princess and a '75 Renault 6TL

#382 Post by vulgalour »

Do you know, I've been looking at this and been completely unable to figure out what was wrong until you point it out and you're right, that trailing shoe does look upside down. I just copied what I removed when I fitted these but if only one shoe is actually working properly it would explain a lot!

Today I found that side was actually sticking on after a couple of miles of driving so I was going to have to go in and have another look anyway, I'll be sure to check the driver's side when I do as I've got to do the bearing that side for good measure. If my rubbish rear brakes is just down to an upside down shoe and me not realising I shall feel very, very silly.
Penguin45
Posts: 174
Joined: Wed Jan 19, 2011 7:39 pm

Re: '80 & '81 Austin Morris Princess and a '75 Renault 6TL

#383 Post by Penguin45 »

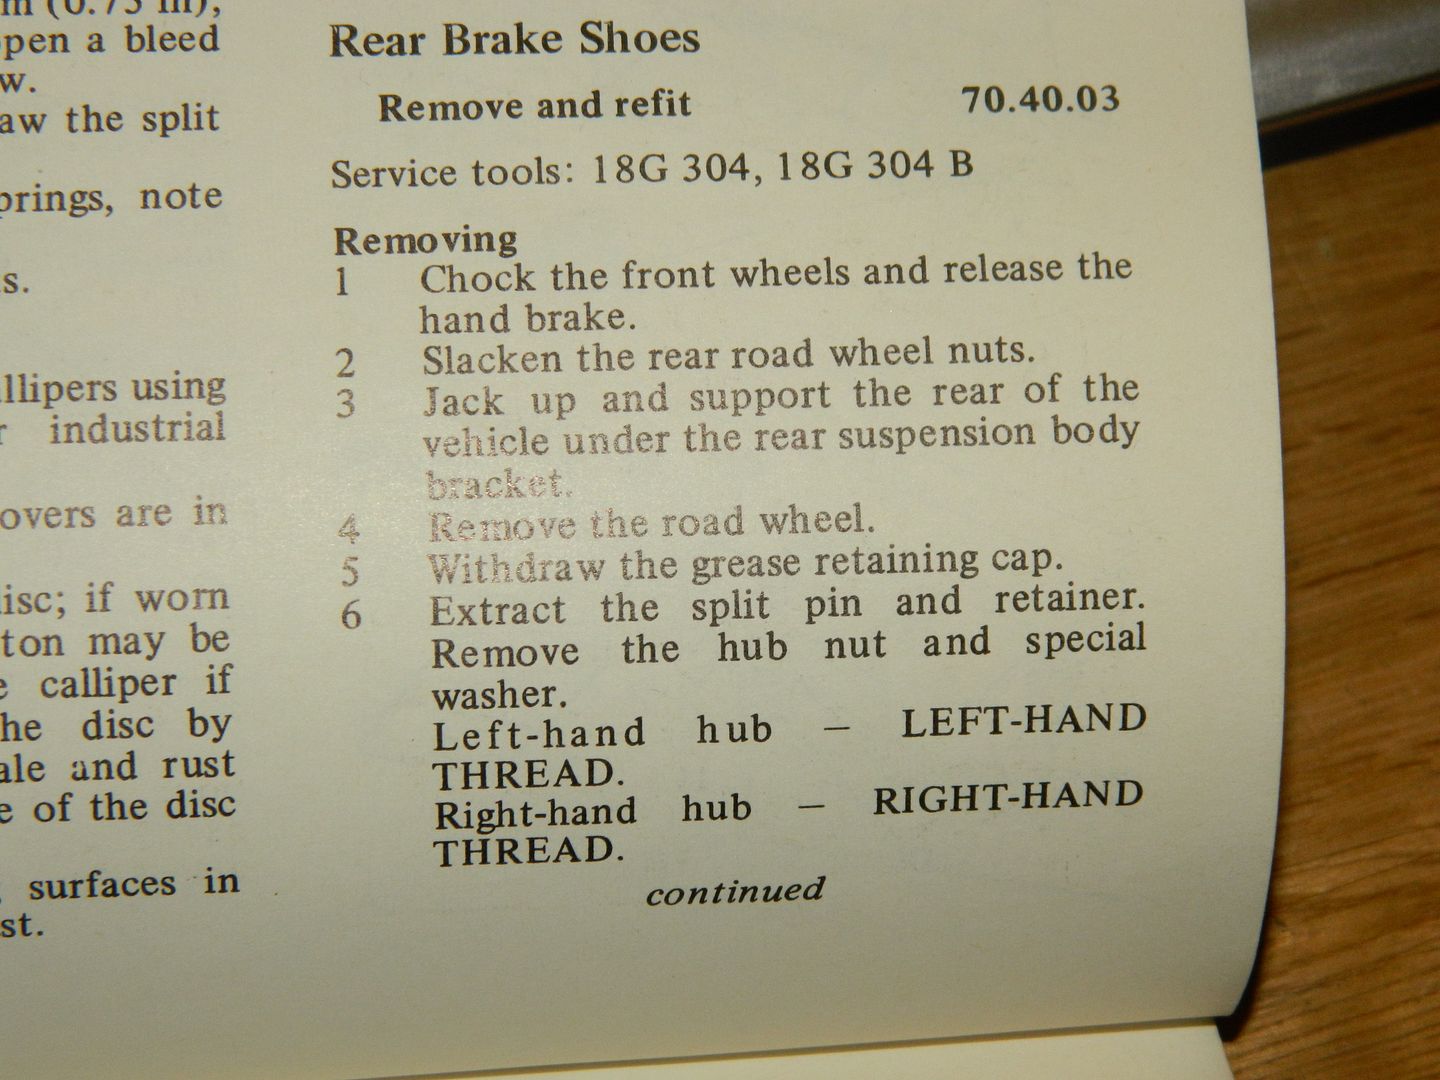
Here:

Image

Image

Image

Image

P45.
Raymk
Posts: 32
Joined: Tue Jan 10, 2012 4:31 pm
Location: Towcester

Re: '80 & '81 Austin Morris Princess and a '75 Renault 6TL

#384 Post by Raymk »

vulgalour wrote:Do you know, I've been looking at this and been completely unable to figure out what was wrong until you point it out and you're right, that trailing shoe does look upside down. I just copied what I removed when I fitted these but if only one shoe is actually working properly it would explain a lot!

Today I found that side was actually sticking on after a couple of miles of driving so I was going to have to go in and have another look anyway, I'll be sure to check the driver's side when I do as I've got to do the bearing that side for good measure. If my rubbish rear brakes is just down to an upside down shoe and me not realising I shall feel very, very silly.
As JPB said, it is very easy to get the shoes in wrongly (if they are). Your photo looks like the passenger side, whereas the manual appears to show the driver's side, ref. Penguin45's post. Apart from slightly abrading the drum surface, faced with brakes that you are not happy with, I would try the rearmost shoe the other way up provided it all assembles ok - both wheels the same of course. No need to feel silly. I once spent a whole afternoon trying to remove the rear wheels from a Mazda pickup (1980s). One side gave no problems, the other seemed impossibly tight despite my scaffold bar extension to the brace. It turned out that Mazda, using their inscrutable Japanese wisdom, had put left hand threads on one side of the vehicle :oops:
User avatar
TerryG
Posts: 6757
Joined: Wed Jan 05, 2011 1:54 pm
Location: East Midlands

Re: '80 & '81 Austin Morris Princess and a '75 Renault 6TL

#385 Post by TerryG »

Raymk wrote:using their inscrutable Japanese wisdom, had put left hand threads on one side of the vehicle :oops:
Rolls Royce used to do that too (I don't know if they still do). I have done exactly the same thing with hub nuts and ended up cold welding one on. nut splitters are damn handy.
Understeer: when you hit the wall with the front of the car.
Oversteer: when you hit the wall with the back of the car.
Horsepower: how fast you hit the wall.
Torque: how far you take the wall with you.
vulgalour
Posts: 674
Joined: Mon Sep 23, 2013 10:28 pm

Re: '80 & '81 Austin Morris Princess and a '75 Renault 6TL

#386 Post by vulgalour »

Bit of grindygrindy today. Originally, I was going to strip the shell and weigh it in but I have time against me, as usual so it's proving quicker to chop the shell up and trailer it to the scrapyard to weigh in that way. I'll keep the front end intact so I can strip components I need off it at leisure as I have almost everything I need off the rest of the car now.

I removed the remaining door, roof and B pillars first. The roof will be used for repairing the beige car. Turns out the repairs to the floor on the orange car was done by cutting the bottom of the front wings off - where the lead flashing is rivetted on - and using that metal.
Image

Removing the driver's side sill was a nightmare. It had been rivetted, welded, fibreglass and bodyfillered on over some of the original sill but not all of it. We managed to get everything but the bit that closes on the A pillar off in one piece, the key part I need is the trailing edge and that came off lovely. We weren't so careful with the other sill but I'll liberate the same trailing edge and may save some of the rest, I do have an unused partial sill that was liberated from the car a fellow forum user tipped me off about so it's not a total loss.
Image

Image

With the sill off and just about all structural integrity now gone, we could make a start cutting through the floor. The exhaust was knackered, as were the brake lines and while the hydragas pipes are okay, they're not perfect. I have managed to save the rear hydragas lines, and the front lines are untouched so it's only the straight centre sections that are scrap. Floor was cut so that the gear selector box didn't have to be split from the car.
Image

Princesses are nose-heavy, as it happens, as demonstrated in this shot.
Image

Ran out of time and discs to do more, but I did get the shell up on its side to inspect underneath and there's rot everywhere you don't want it. The extent of the rust bug is fairly comprehensive, much more so than the beige car, and it demonstrates just where and how they like to rust. The petrol tank has a large rust hole by the sender. The floors had rotted out over both jacking points quite comprehensively, the rear corners which had been plated also had galloping rot that had spread into the inner sill, the old outer sill, the rear arches both inner and outer and was merrily going through the underside of the car as if it were an ADO16. It would have been a lot of work to put this right so I'm really glad I made the decision to break this one rather than the beige car.
Image

Tomorrow I collect welding supplies and more cutting discs so I can get this rear half cut down and weighed in, shouldn't take too long. Everything from the A-pillar back is so light that I can move it on my own so I probably won't get much when I weigh it in. The rest of the coming week is going to be devoted to getting rid of the bits of the orange car I don't need and getting as much work as possible done on the beige one.
3xpendable
Posts: 814
Joined: Tue Apr 12, 2011 8:03 am

Re: '80 & '81 Austin Morris Princess and a '75 Renault 6TL

#387 Post by 3xpendable »

Just be careful when manhandling the rear end around on your own, it will be heavier than you think and also watch the sharp ends. I've seen some cringe worthy injuries.
2013 Dodge Durango R/T
2019 Ford Mustang Bullitt.
1965 Ford Anglia 106e Estate (Wagon). LHD.
rich.
Posts: 6893
Joined: Wed Jan 05, 2011 9:18 pm

Re: '80 & '81 Austin Morris Princess and a '75 Renault 6TL

#388 Post by rich. »

did the mindless violence make you feel better?? :lol: oh watch out for the edges they can be a bit sharp...
vulgalour
Posts: 674
Joined: Mon Sep 23, 2013 10:28 pm

Re: '80 & '81 Austin Morris Princess and a '75 Renault 6TL

#389 Post by vulgalour »

I've been using welding gloves to move the shell about. I was going to finish chopping it up today but apparently today is the day we get all the rain. Spent the day getting stuff to get my Clarke 175TE welder up and running which was very, very kindly donated to the cause by a fellow enthusiast of bizarre old cars.
rich.
Posts: 6893
Joined: Wed Jan 05, 2011 9:18 pm

Re: '80 & '81 Austin Morris Princess and a '75 Renault 6TL

#390 Post by rich. »

bizzare, please explain?? :?
Post Reply