Vulgalour's Vehicles - 10/03 Ignition Switch Woe

Post pictures and stories about your cars both present and past. Also post up "blogs" on your restoration projects - the more pictures the better! Note: blog-type threads often get few replies, but are often read by many members, and provide interest and motivation to other enthusiasts so don't be disappointed if you don't get many replies.
Message
Author
vulgalour
Posts: 674
Joined: Mon Sep 23, 2013 10:28 pm

Re: '80 & '81 Austin Morris Princess and a '75 Renault 6TL

#671 Post by vulgalour »

30th July 2015
A little more Rover fettling was done today, not a huge amount because I wasn't blessed with much free time. This morning Bradford Auto Spares got a call so I could order a pre-facelift bonnet release mechanism from them for £25 delivered, then it was off to the unit to get on with some other jobs there. While waiting for paint to cure I decided not to be deservedly idle but to fettle again.

Decided to remove the rear panel off the boot, this is attached with 5 nuts from the back, two screws from the front and a further two screws through the number plate. The original dealer plate this car still sports is actually fitted off centre, which does annoy me, and one of the screws had to have the head drilled off. Other than that it was easy to remove the lot and get it cleaned up.
Image

Inspected the boot lid and found it nicely free of any rust at all, just your typical dirt and moss.
Image

The number plate light lenses need to come off to be cleaned, they're quite dirty inside. I was in no mood to do that today so it can wait for another time. The moss on the return lip came off easily enough.
Image

There were two reasons for removing this panel. The first was to get it realigned properly because it didn't line up with the lights. That was quite important for the second bit, which was to give the thin red tape a go. I'm satisfied about this, it splits the big block of black up just enough. A nice twin exhaust pipe box or even a trim on the existing pipe once it's been shortened would make the back end just how I want it.
Image

Image

I still had some time and I probably should have just chilled out a bit. Instead, I carefully wet sanded the lacquer peel back on the top of driver's door. I had found a can of Rover Flame Red in my stash which I didn't realise I still had and this came in handy for where the paint was very thin.
Image

Fresh coat of lacquer on top and when I next get chance I'll flat and polish that back to make it an invisible repair. The door handle will be done off the car, as will the bit of lacquer peel just under it. It's a fairly quick job really, and quite nice to eliminate one of the uglier bits I see every day on the car.
Image

With everything done that I had time for I moved the car out of the way and heard a horrible noise. Turns out I reversed over the drill. Still works so we've just bandaged it up and continue to use it.
Image
vulgalour
Posts: 674
Joined: Mon Sep 23, 2013 10:28 pm

Re: '80 & '81 Austin Morris Princess and a '75 Renault 6TL

#672 Post by vulgalour »

1st August 2015
Today, it was determined I'd get started on sorting out the clutch. Mike foolishly offered to help and my brother appeared too so we had a good pool of knowledge and tools and whatnot to get it done. Shouldn't be too much of a bother really, access to the gearbox and everything looked fairly good and I had all the parts I should need so we cracked on with it, optimistic we'd be all done before the sun went down. I mean really, how hard can it be?

Before we get into that, I had been doing some work on the front wing Joe supplied. I wasn't going to take it as I thought the one on the car was much the same, but after spending a bit of time with the dolly kit and flapwheel I think it's worth doing up and swapping onto the car. Both wings have this sort of warty rust bubbles.
Image

Liberal application of the flapwheel makes short work of it. The steel is in reasonable condition. There are other methods to clean up rust but I'm going with one that has always worked for me and lasted for a long time. Clean everything back where you find the rust until you've got shiny metal. Some areas are trickier than others. You'll need to go a bit further than this, but this is how it starts. Be sure to chase the rust spiders back because otherwise they'll just emerge again when you repaint.
Image

There's a small hole in the return lip. I will probably give this a quick blob of welding to fix it properly. However, Rover fitted a rubber U channel trim to the lip that would hide this well. I'm not sure if the trim is supposed to prevent or cause rust.
Image

Some areas cleaned back to shiny metal and discoloured blackness where the rust was.
Image

After everything was cleaned up, including the dent I dressed out on the top of the wing, it was all treated with Jenolite brand rust converter and left until tomorrow when I hope to have time to clean this up and get some fresh paint on (NB: I still haven't, but I will)
Image

Image

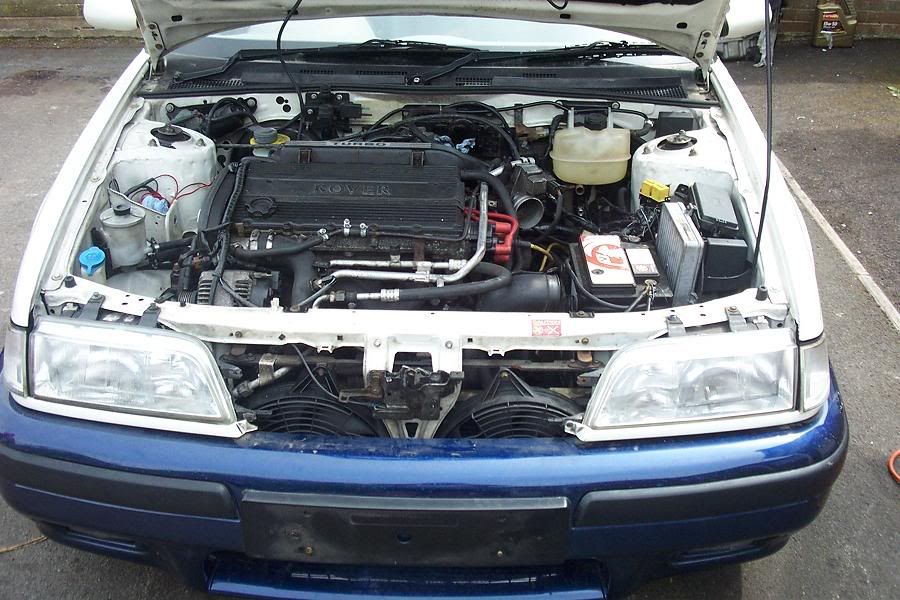
A couple of days ago I made a start cleaning the engine bay but didn't have much patience for the job so let it be at this. Tidier, but not as good as I want it to be yet.
Image

So, onto the clutch job then. First up was to remove the battery and air filter again. Then the starter motor came off which in hindsight probably wasn't necessary.
Image

Gearbox is pretty oily and grimy, it looks like it has had a spill or come back through the vent or something in the past and never been cleaned up. It's all fairly old oil.
Image

With the car up on stands, Mike and I set to removing things like the front partial undertray and disconnecting the gear selector rods and all that stuff. It should have been a simple matter to disconnect the lower arms. The inner bolts (two each side) were almost impossible to shift but did eventually relent. The castle nuts on the lower balljoints, however, were a different matter entirely. Now, it is possible (NB: it was possible, communal brain fog on that one) we didn't need to disturb these and could have done the job leaving them in place. Unfortunately by the time we realised this we had also discovered both nuts, split pins and bolt threads were just collections of rust and attempts to remove any of these items just made matters worse. We wasted a lot of time on this part of the job.
Image

Unfortunately we had to resort to cutting through the threads and removing the arms. Since you can't just get the ball joint and have it pressed into old arms, a new pair had to be ordered which won't arrive until Monday now. Really disappointing but at least there's the reassurance of nice new parts going on.
Image

While the passenger side hub came off nice and easily when we got to removing the driveshafts, the driver's side needed a little help. The wheel nuts this side were also done up so tight the rattle gun struggled to shift them.
Image

One driveshaft out and another derp moment - it was one of those days - when we realised neither of us had remembered to drain the gearbox oil. There's supposed to be two litres in there, at best 1.5 litres came out and it had a distinctly burnt smell and look to it.
Image

With the driveshafts out we found the passenger side one was nibbled and leaking and the driver's side one was deformed so we'll have to get a pair of those ordered, it was by now too late in the day to place an order for them so it has to be done tomorrow. Yet more expense that I hadn't expected. Removing the gearbox was a chore too, finding all the bolts wasn't too bad but then getting access to some of them was annoying, like this one. You couldn't put the ratchet directly on the socket because it was too close to the casing and you couldn't use a spanner or similar because the bolts had been overtightened, just like pretty much every bolt we'd encountered.
Image

Eventually we got the old clutch out. There was quite a bit of meat still left on it and it all looked fairly new apart from the release bearing which looked quite old and was a different manufacturer to the rest of the clutch. The friction plate had also been installed the wrong way around. This may explain the issues I was having. There was also signs of hot spots. I had been expecting a paper thin clutch with shiny rivets, not this.
Image

We were quite puzzled by this to be fair, it looks like someone had taken the time to change the clutch in the car but had done it wrong which in turn had led to the symptoms of a dead clutch. While my brother and I cleaned as much of the oil as we could off the gearbox - I like to clean things when I get them off the car, helps me see where I've been and makes things look nicer - Mike quietly got on and reinstalled the clutch.
Image

Then we called it quits. We'd spent way too long on this, mainly because we were fighting bolts that were on so tight they were bending the breaker bar and we were all pretty fed up with it. Tomorrow I'll be going in with Mike to get the gearbox back on and do any other small jobs I can find (and there's still plenty of those) just to make sure the car's time inside the unit isn't wasted. I'll go in again on Monday to fit the new parts, providing they arrive and are correct.
vulgalour
Posts: 674
Joined: Mon Sep 23, 2013 10:28 pm

Re: '80 & '81 Austin Morris Princess and a '75 Renault 6TL

#673 Post by vulgalour »

2nd August 2015
Unlike yesterday, today was a good day to work on the Rover. Gearbox went back on with minimal hassle and most things plumbed in easily. The clutch pedal now has some spring to it where before it offered nothing at all. Perhaps that has resolved the issue and I've escaped any sort of gearbox malady. Gearbox oil and antifreeze were also acquired for when we get to that point. Gearbox looks far better and was much nicer to move around without its crust of oil.
Image

The only bit left to connect is this stupid little rubber clip for the speedo cable. Anyone got any tips on this one for us? It doesn't seem to want to go back where it came from.
Image

My brother found the sticker machine.
Image

Image

Image

Flange I'll tolerate, but not boot badges. Still, he chased out and welded up that little hole on the wing. I'll get this dressed back and tidied for paint.
Image

He also welded up the bonnet holes, which was nice of him.
Image

They dressed back really well. White grille is only there temporary, we kept picking it up and moving it so thought it best to just stick it to the front of the car so it didn't get broken.
Image

Image

We had enough time to get two goes over with the stopper filler before home time. It needs more work, but not a vast quantity. If it weren't such a visible panel I wouldn't bother making it more presentable than it is because there'd be no need.
Image

Then the important task of temporarily fitting the new wheels had to happen. These are the three alloys with tyres and centre caps that cost me £1. A quick clean up and a rear door badge applied with a bit of masking tape shows what I want to do with them. They work surprisingly well.
Image
vulgalour
Posts: 674
Joined: Mon Sep 23, 2013 10:28 pm

Re: '80 & '81 Austin Morris Princess and a '75 Renault 6TL

#674 Post by vulgalour »

3rd August 2015
This job is dragging on so much now, it's pretty frustrating. The parts order came in but it turned out the driveshaft oil seals couldn't be got so I ended up going to Rimmer Bros so I could get them delivered next day just to get this job over and done with (which was really expensive for what was bought). So we're still not back on our wheels yet and I still can't try out the new clutch to find out if it's that or the gearbox or both that were actually at fault.

Anyway, we got on with what we could. Mike has been trying to get the remains of the lower ball joints out of the hubs and it's been such a nuisance that we're taking the struts off to resolve it on the bench. Another of those things that should have been super quick and has just dragged on because the usual methods just aren't working. Instead, we got the new outer CV gaiters fitted, something that was made much easier by using the cone and the bench vice.
Image

Image

While Mike was doing that and some other jobs I got on with the bodywork side of things, namely trimming the grille to fit. I'd also left the replacement bonnet latch soaking in some thinners to clean it up. The original latch has a wired connection, we're not sure what that's for yet as we've not tested it but we're expecting it's for the alarm or to illuminate a bonnet open light on the dash, much like the boot has. The new latch doesn't have this wiring. Trimming the grille was pretty easy thanks to the bench grinder.
Image

Did some more work to the bonnet edge and after this shot I put on the primer which for some reason reacted and just peeled off. I wasn't best pleased about this because it managed to react with everything on the metal and undid a lot of work.
Image

So I cleaned it all back to bare metal and started again. Fresh primer so I can find where to fill.
Image

I slapped a lot of filler on and took nearly all of it off again getting back to a smooth panel.
Image

Then put some more primer on, top coat and lacquer. End result is reasonable if not perfect and will want polishing and whatnot to finish off properly. It will do for now.
Image

The white trimmed grille was tidied up, primed, painted and lacquered. It needs a polish much like the bonnet does but is perfectly respectable now.
Image

The old bonnet latch has a black plastic trim on it but when fitted to the new one it fouls the grille. I left it off, no harm done. Front of the car is much better, just needs a bonnet badge to finish it off properly.
Image
vulgalour
Posts: 674
Joined: Mon Sep 23, 2013 10:28 pm

Re: '80 & '81 Austin Morris Princess and a '75 Renault 6TL

#675 Post by vulgalour »

Why, car, why?

There wasn't going to be a second update on this today, but Mike and I were persuaded to return by my brother after we'd had something to eat and a bit of a sit down at home. The passenger strut was removed when it was determined getting the remains of the balljoint stud out wasn't going to be possible in situ. Happily, the suspension is in pretty good order and the strut tower is really clean.
Image

Track rod ends look fairly new and came apart quite easily - compared to everything else - which was a relief.
Image

With the strut in the vice the leg was removed from the hub, which although difficult due to a fairly crusty bolt, wasn't impossible. The goal here was to get the remains of the lower ball joint out of the hub and for that we needed to strip things down to the smallest we could. Later the disc and caliper were also removed for ease of access.
Image

Even with three of us, various manual and power tools and lots of swearing we couldn't get this to budge at all. Tomorrow both hubs are off to the local engineering company to get the bits out and if they can't do it then I need to find some new hubs. This is all because we tried to undo some castle nuts that were nothing but balls of rust. Lesson learned for the future: leave well alone. (NB: there is a simple, free solution to this problem, which is in a later part of this update).
Image

Image

Trying not to worry too much about this. With a relevant hydraulic press we're hoping the stubs will just push out and everything can be bolted back together but what a nightmare it has turned into! Mike and my brother were mostly fettling with mechanical things and trying to think of a way to get those stubs out so I turned my attention to the deep scratches on the boot lid. After a few passes with the machine mop and cutting compound I'd got the worst of them out. It will need some fresh lacquer at the least to get it all sorted, some of the scratches are really deep.
Image

It's difficult to photograph, the red is really photogenic. You can just about make out that I've done the right hand half of the boot lid but not the left as the left is slightly orange and more obviously scratched. Flame Red is definitely up there in the Resale Red shades at being excellent at hiding damage and looking fantastic at its worst and being really stunning at its best.
Image

With more time I got the left side of the boot done and it's now looking far more presentable and wearing a coat of polish.
Image

I'll work around the car with the machine mop to get the worst of the scratches out that I can. This will help me pick and choose which bits of paint damage to deal with as I go, it's difficult to tell just which scratches are going to polish out and which ones need paint and lacquer to remedy properly.

Tomorrow I won't be working on the Rover but Mike will. I've got to do just one job, I don't have the energy to be working at the unit and working at home on my regular job for another day, I'm just exhausted by it.
vulgalour
Posts: 674
Joined: Mon Sep 23, 2013 10:28 pm

Re: '80 & '81 Austin Morris Princess and a '75 Renault 6TL

#676 Post by vulgalour »

4th August 2015
The most important thing to impart is that tonight I DROVE the Rover home. This is a Good Thing.

The balljoint stub was got out using the hit-it-with-a-hammer technique. I'm told it wasn't the easiest even then but both did eventually ping out leaving us with a nice undamaged hub ready to accept the new ball joint, which was a massive relief.
Image

That meant the arm could be put back together and put on the car. New driveshaft oil seals were fitted to cure the one big oil leak the car did have, it will likely have some smaller ones somewhere being a Rover. Driveshafts back in, brand new lower arms fitted, tie rods reattached and everything where it ought to be before we could get the brakes and wheels back on.
Image

This went swimmingly until I managed to do this.
Image

Yep, that's a ratchet spanner stuck on the lower ball joint stud because I'm an idiot. Slackened off the hub nut and slid the driveshaft out just far enough to free the spanner before tightening it all up with a more different spanner. Job jobbed.
Image]

Then we went to do the brakes and another problem. The new pads are the wrong ones so I need to take those back. For now, and I'm aware it's a big no-no, it's new discs and old pads because the old pads still have plenty of life and they'll be replaced as soon as the new pads arrive.
Image

After that we checked all the various fixings to be sure it was all tight and sorted then put the car on its temporary wheels, topped up the gearbox with two litres of lovely fresh oil and test drove it around the yard. GONE is the weird scrapey-draggy noise in first, second and third. HERE is an actual biting point on the clutch. No weird noises, no untoward smells, no issues at all. No further issues on the drive home either with the exception of one dust shield which is rubbing ever so slightly on a disc but not enough to leave a mark on it, I'll give it a little tweak in the daytime. It felt great to drive home and not face another day of frustration and expense sorting mechanical stuff out. The really big jobs that I know about are now resolved and I should have a really good little car that I can continue to tidy up and make excellent.

5th August 2015
Made a start cutting and polishing the new paint on the bonnet but I really need to get the car inside the unit to do it properly, the weather is all wrong for doing it outdoors and I'm ending up with too many marks in the paint. Still, it's showing promise with just a quick pass over this lunch time and I'm sure with a bit more graft it'll look like I haven't even done anything.
Image

I'm happy enough with how the car looks now, it's very nearly how I want it to look. Clutch is taking some getting used to and the cable and/or pedal needs some adjustment to be spot on. New (hopefully correct) brake pads arrive tomorrow afternoon so I can fit those and hopefully fettle the dust shields a bit more because one is still catching just a tiny bit somewhere.

Gearbox no longer makes an unpleasant noise in first, second and third, which is really reassuring. Driveshafts are behaving themselves, fluids are staying where they're put, temperature never goes above the first third on the gauge and the car feels really nice to drive now. Quite pleased, all told, which is a relief considering the marathon it's been these past two weeks or so.

Bodywork will be the next big thing to sort and I'll tackle it a panel at a time. There's quite a few parking dings and dents here and there, some look like they'll dress out from the back of the panel, some don't. There's a couple of minor rust blemishes on arches and doors but the sills are pristine so far as I can see. The car gets noticed a lot, the only other R8 I've seen up here is the Nightfire Red Tourer with terminal lacquer peel, previously spotted in April this year and more recently driven past while I was in the Rover on the way to the shops.
Image

Image
vulgalour
Posts: 674
Joined: Mon Sep 23, 2013 10:28 pm

Re: '80 & '81 Austin Morris Princess and a '75 Renault 6TL

#677 Post by vulgalour »

PHEW, that was a *big* update. All up to date with it now though. I'm happy to report that motoring in this car is great. After a string of cars that haven't been as good a fit for me as the Princess I've finally discovered one that comes close for daily use and that needs now to only have minor fettling work to bring it up to my own impossible standards. The only things holding me back, as always, is time and money but given that the Rover costs so much less to run than the Xantia was the money side of things will be less of an issue than usual for me.

The other thing I keep having to remind myself is that this little car that feels quite modern to drive is actually 20 years old. Unlike the Corsa this has many of the modern conveniences that people expect as standard and with the exception of the remote locks on the driver's side, they all work. The steering is light and precise, fuel consumption is very good, the engine is an absolute hoot and gear changes are confidently precise. Lights are bright enough that you're confident people behind can see you and people in front can be seen. The seating position is excellent and the visibility, the one thing that really sets it apart from a new car, is incredibly good. The only disadvantages I can see of this car over something newer is crash protection - though I do have an airbag and seatbelt pretensioners - and the availability of parts when things do wear out. Those are comforts I've always done without so it's no big loss for me.

When people mention the phrase 'practical classics' these are the cars I think of. They're barely distinguishable to drive from a modern car when it comes to convenience and ease but they retain some sense of feeling and fun, you're still connected to the road so you can still enjoy driving whether it's a cross country lope or a round town bumble. Many 90s cars really did hit a sweet spot of convenience and driving experience. Just a shame not everyone is willing to embrace these 'new' cars just yet.
3xpendable
Posts: 814
Joined: Tue Apr 12, 2011 8:03 am

Re: '80 & '81 Austin Morris Princess and a '75 Renault 6TL

#678 Post by 3xpendable »

Ahh that takes me back, my first car was a shagged Rover 414si on a G plate. God knows why I bought it but it needed a gearbox and head gasket and 4 new tyres which my dad did. I used it for a year and hated it drving about 300mls a week, it was a complete POS and eventually I was overjoyed when it was stolen. Sadly I got a phonecall about 6 weeks later to say it had been found! On Gower beach no less and fully intact except the steering lock was broken and the bonnet was missing.

I was going to just weigh it in for scrap but one of my dads customers wanted a car for their spoilt kid so we put a steering lock on it, a new bonnet (in gold on a green car) and flogged it to them. The n about a month later he got it stuck on a beach and the tide swallowed it up, so it's somewhere in the Irish sea now!

Agreed about the practical classics part, and I do have a soft spot for the 90's Rovers. They were very comfortable and actually very good cars with the Honda 1600 motor.
2013 Dodge Durango R/T
2019 Ford Mustang Bullitt.
1965 Ford Anglia 106e Estate (Wagon). LHD.
mach1rob
Posts: 1787
Joined: Wed Jan 05, 2011 3:22 pm

Re: '80 & '81 Austin Morris Princess and a '75 Renault 6TL

#679 Post by mach1rob »

vulgalour wrote:The original latch has a wired connection, we're not sure what that's for yet as we've not tested it but we're expecting it's for the alarm or to illuminate a bonnet open light on the dash, much like the boot has. The new latch doesn't have this wiring.
The wiring is there for the alarm, and the catch is usually the thing that gives the most trouble with the system.

Those little trims under each headlight differ too between cars with and without the chrome grille, early ones are rare nowadays, sadly I didn't see this before you modded the grille, as I'm sure I have a pair in the shed, along with quite a few bits from these, having owned and broken many over the years. They're cracking little motors, one of Rovers best.

Few that have passed through my hands over the years, so any questions you can't find out, just shout :)

416 Tourer
Image

214 SLi (ex dads, was a low mileage minter)
Image

another 214 SLi, SEi interior too,
Image

420 GSi Executive (minus the fancy alloys it used to wear) alongside my later 216 Si
Image

with its beige leathery goodness
Image

420 GSi Sport that cost me £20, bought with a snapped cambelt. 1 owner from new car too!
Image

and I'll stop now, my ex 416 Tourer, that had a 2.0 turbo swap :twisted:
Image
Image

Great to see one being loved again :D
vulgalour
Posts: 674
Joined: Mon Sep 23, 2013 10:28 pm

Re: '80 & '81 Austin Morris Princess and a '75 Renault 6TL

#680 Post by vulgalour »

Happily, it turns out I don't need the bonnet catch connector as the alarm works perfectly fine without it, as I found when unlocking the boot without disarming the alarm. Slightly embarrassing when it happened. To be honest with you there's not really anything the car wants apart from some paint attention and to find out why the passenger headlight is so wonky. I knew the under-headlight trims were going to be virtually impossible to find so modifying the grille was a bit of a no-brainer.

There are a couple of niggles I'd like to resolve. The driver's side remote locking solenoids make a noise but don't actually unlock the door and I've not investigated further to find out why. The driver's door card needs repairing/replacing because of the disintegrated top. All my interior wood has gone a bit cloudy and, in a couple of places, the lacquer has come off.

I wouldn't mind getting some headlight protectors, wind deflectors for the side windows and some sill skirts but I'm in no rush. It's weird having a car that doesn't mark its territory when parked, can't get used to that.

Work has been robbing me of car time lately. I work funny hours and they're overlapping with when I'd normally have free time for welding and painting and tinkering and such. As a result I'm making absolutely no progress on the Renault and the Princess even though I've got the means and motivation to do so. Soon as I get the time you can guarantee means and/or motivation will dry up.
Post Reply