Page 9 of 13
Re: Austin A35 Project
Posted: Sat Mar 25, 2023 2:51 pm
by Dick
Great to see this again.. keep up the good work

Re: Austin A35 Project
Posted: Sat Mar 25, 2023 6:26 pm
by gazza82
Annual visit to NEC today .. Restoration Show ..
Boy was it quiet! Only two halls (plus a bit of hall 3) where a few years ago it covered 4 or 5. And as I drove straight off M42 into the car park without any queues I can only guess that footfall was down. A lot!
The A30/A35 Owners' Club stand was a popular point though .. possibly due to these ...
Based on the HDRC Academy cars with a 1310cc Marina engine.
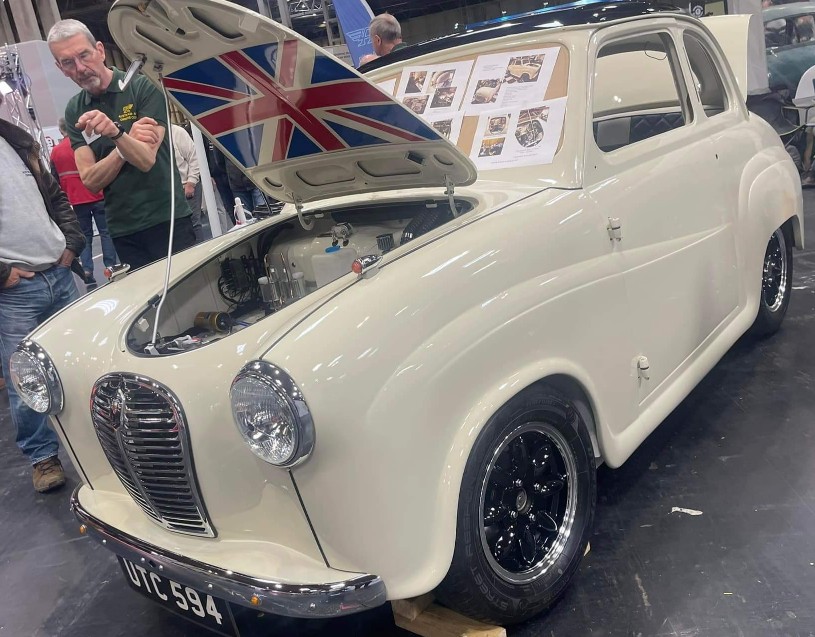
- Powered by a 1310cc HDRC-spec Marina Engine
- FB_IMG_1679767047911_copy_815x637.jpg (142.11 KiB) Viewed 2627 times
This one is a space-frame with an A30 body suitably modified to fit over the top and is designed as an out-and-out race car. Yes that is a small block V8.

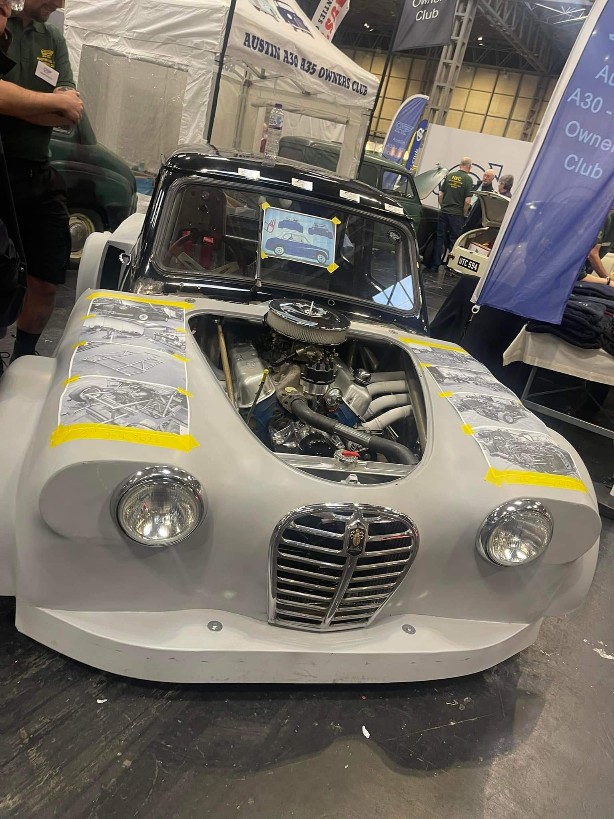
- Yup .. a V8
- FB_IMG_1679766681103_copy_614x819.jpg (154.82 KiB) Viewed 2627 times
Re: Austin A35 Project
Posted: Sat Mar 25, 2023 6:37 pm
by gazza82
Dick wrote: ↑Sat Mar 25, 2023 2:51 pm
Great to see this again.. keep up the good work
Thanks!
I picked up a 4-bottle Raptor kit today at the NEC (about 20% off!) and it's the tintable type which is destined for the underside .. when I decide what colour to tint it ..

Now I'm back from a couple of weeks R&R (SUN!) I'll be pulling out the overalls, shaking out the spiders that no doubt have taken up residence, and getting going again on "Bitza" the A35.
At least our spiders aren't as big as this lady!

- Arachnid Warning!
- 20230314190451_IMG_3336_copy_1296x864_copy_144x91.jpg (13.14 KiB) Viewed 2626 times
Re: Austin A35 Project
Posted: Tue May 30, 2023 7:17 pm
by gazza82
Hoping to get some work done on "Bitza" on Friday .. most of May was a wash-out as far as car restoration goes as we were having a new bathroom installed .. and I was having to watch their every move to ensure it was done as requested.
As well as the only person who could get into some of the loft spaces to help with wiring, as well as adding some insulation behind stud-walls while there was plenty of access - two of the stud-walls in the bathroom were being "reworked".
Oh and making tea and coffee

Re: Austin A35 Project
Posted: Wed May 31, 2023 6:51 pm
by Dick
Why did you have to watch everything the builders were doing

Re: Austin A35 Project
Posted: Wed May 31, 2023 7:42 pm
by gazza82
To make sure they were doing it how I wanted it .. and would have done it had I had the time and tools!

OK I didn't watch everything, but I did have to make sure we got what we paid for .. the guy who should have been running the project was laid up after the London Marathon with a damaged hip!
Re: Austin A35 Project
Posted: Fri Jun 02, 2023 5:48 am
by Dick
How big is the bathroom? I'm plasterboarding and tiling one now.. when the plumber and his useless mate finally arrived it was a bit crowded ..

Re: Austin A35 Project
Posted: Fri Jun 02, 2023 6:08 pm
by gazza82
So today was spent "linishing" .. basically taking off the c@rp welding and smoothing them.
And in the process trying to set my hair alight with hot metal bits!
Re: Austin A35 Project
Posted: Sun Jun 04, 2023 7:17 am
by Dick
gazza82 wrote: ↑Fri Jun 02, 2023 6:08 pm
So today was spent "linishing" .. basically taking off the c@rp welding and smoothing them.
And in the process trying to set my hair alight with hot metal bits!
All part of the fun...

Re: Austin A35 Project
Posted: Wed Oct 25, 2023 6:59 pm
by gazza82
So lots of playing with cardboard and scissors over the past couple of weeks ...
I'm re-building what should be some "box" sections behind the front panel and join that to the inner engine bay panel, inner wings and wheel arches/tubs. The reason? They don't make these bits and most of the A35's have vanished into piles of rust on the garage floor!! The area between the two front panels has just two drain holes so over time all the carp that gets through the rad grille and then deflected to the right and left just soaks up the wet and slowly the car dissolves ...
The two main vertical side sections are available as repair panels as is the front valance that sits behind the bumper but the latter involves a lot of cutting away to remove and replace so I've decided just to cut out the rot and weld in patches. The other parts which are part of the front edge of the wheel arches are to be replaced as have been two small sections on either side of the front panel. The return flanges of the front panel were also rust and as these not only join the front panel to the inner wings but are also used to bolt on the front wings they have had to be remade. Otherwise 757s wings would simply be flapping in the breeze.
So out with the old Cornflake boxes, scissors and pen(s), transfer the shapes to metal and the Monodex cutter does the rest.
I'm actually going to try and bond these parts together as welding is almost impossible and the factory used a spot-welder fo a lot of that area .. something I don't have (including the required "expert" welding skills yet!).
JB Weld (epoxy) seems to be doing a reasonable job of the smaller parts but I've also got some Pliogrip 8115 (metal bond) which comes in larger tubes and fits a normal caulking gun. I'm planning to try that on the larger areas and wider flanges/overlaps.
I'll try and add some photos but at the moment they are too large to upload ...