Post pictures and stories about your cars both present and past. Also post up "blogs" on your restoration projects - the more pictures the better! Note: blog-type threads often get few replies, but are often read by many members, and provide interest and motivation to other enthusiasts so don't be disappointed if you don't get many replies.
-
gazza82
- Posts: 422
- Joined: Tue Nov 17, 2015 7:38 pm
- Location: Buckinghamshire
-
Contact:
#91
Post
by gazza82 » Sun Oct 29, 2023 7:38 pm
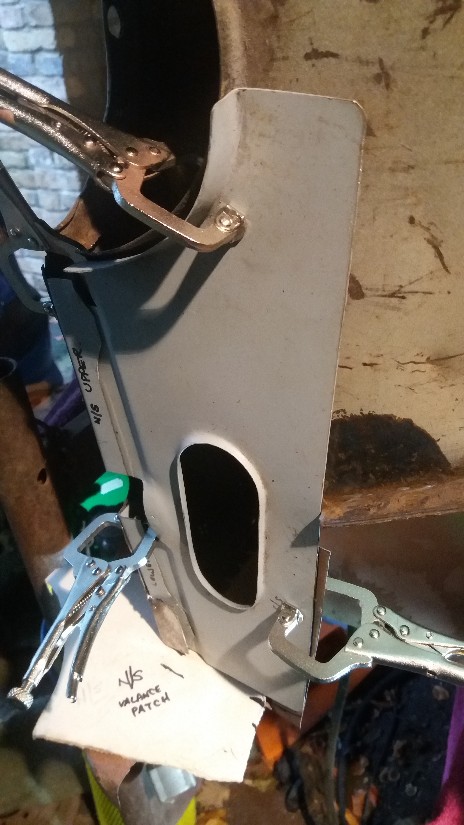
Here's a pic of the new "flanges" on the nearside I've had to create to replace what was "de-laminated rust":

- 20231024_170237_copy_464x825.jpg (92.07 KiB) Viewed 1283 times
You should also be see the new piece I've welded in the front panel. That will eventually be attached to the patch that is going into the valance soon.
And this is going to be attached using the Pliogrip .. in fact this one has but I've not been down the garage to check it this weekend ..

- 20231019_164212_copy_464x825.jpg (89.68 KiB) Viewed 1283 times
Behind that will be the valance and that will be bonded to this new piece on the flange that sticks out the reverse side. Then the side and those new flanges will be joined to this new piece
- 20231019_164157_copy_464x825.jpg (90.78 KiB) Viewed 1283 times
Hopefully by the end of the week this piece will be inplace and immovable!

"If you're driving on the edge ... you're leaving too much room!"
Retirement Project: '59 Austin A35 2-door with 1330cc Midget engine and many upgrades
Said goodbye: got '98 Alfa Romeo 156 2.0 TSpark to 210K miles before tin worm struck
-
Dick
- Posts: 1291
- Joined: Wed Sep 11, 2019 7:31 pm
#92
Post
by Dick » Wed Nov 01, 2023 6:12 pm
Pliogrip, that sounds interesting.. let me know what happens

-
gazza82
- Posts: 422
- Joined: Tue Nov 17, 2015 7:38 pm
- Location: Buckinghamshire
-
Contact:
#93
Post
by gazza82 » Sat Nov 25, 2023 9:00 pm
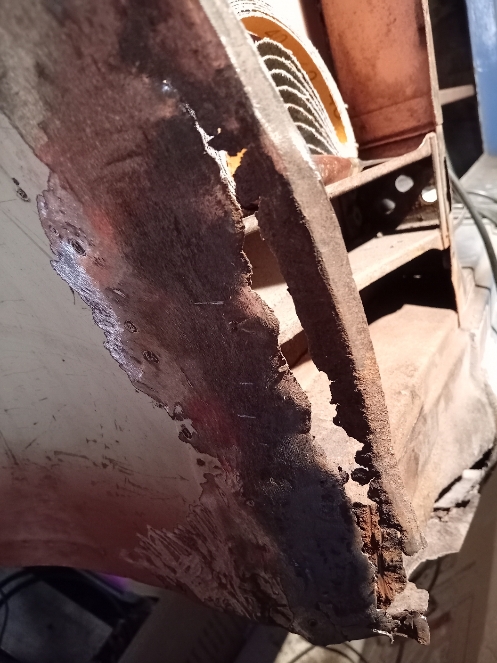
Think this is called "the point of no return"

- Bit missing there ...
- 20231125_194047_copy_784x441.jpg (95.83 KiB) Viewed 1175 times
The outer sill was very corroded and had very little strength ..

"If you're driving on the edge ... you're leaving too much room!"
Retirement Project: '59 Austin A35 2-door with 1330cc Midget engine and many upgrades
Said goodbye: got '98 Alfa Romeo 156 2.0 TSpark to 210K miles before tin worm struck
-
gazza82
- Posts: 422
- Joined: Tue Nov 17, 2015 7:38 pm
- Location: Buckinghamshire
-
Contact:
#94
Post
by gazza82 » Tue Nov 28, 2023 6:26 pm
Dick wrote: ↑Wed Nov 01, 2023 6:12 pm
Pliogrip, that sounds interesting.. let me know what happens
In the end I only used it to fix the two patches I made to go over the front lower edge of the wheel arch and the small return flanges. After a few gentle tweaks to get the angle right to fit over that new panel they were still attached. I've got to use it again for the valance patches but will leave it until I use it on the rear panels behind the wheel arches. I plan to bond the curved patches on rather than welding so avoiding distorting the original metal.
Pretty sure as long as the two surfaces are really clean and rust free they will be on there permanently.
My problem at the moment is it is too cold and the epoxy takes a few days to properly harden.
So I've moved on to the sills. Both of which need replacing and both will be welded one. It's taken a couple of afternoons to remove the old metal and clean up the inner sill where the welding will take place. Now need to trim the new sill to fit around the B-post and over the rear side panel. Must be 1/2" of lead filler over the old joint.
"If you're driving on the edge ... you're leaving too much room!"
Retirement Project: '59 Austin A35 2-door with 1330cc Midget engine and many upgrades
Said goodbye: got '98 Alfa Romeo 156 2.0 TSpark to 210K miles before tin worm struck
-
Dick
- Posts: 1291
- Joined: Wed Sep 11, 2019 7:31 pm
#95
Post
by Dick » Wed Nov 29, 2023 6:19 pm
Could you warm up the metal to set the glue? I use something similar to fix bolts into walls and it's great except when it's cold..trying to warm up walls is a bit more complicated..
-
gazza82
- Posts: 422
- Joined: Tue Nov 17, 2015 7:38 pm
- Location: Buckinghamshire
-
Contact:
#96
Post
by gazza82 » Thu Nov 30, 2023 11:54 am
Dick wrote: ↑Wed Nov 29, 2023 6:19 pm
Could you warm up the metal to set the glue? I use something similar to fix bolts into walls and it's great except when it's cold..trying to warm up walls is a bit more complicated..
That's an idea. I'll try that on the rear end patches
"If you're driving on the edge ... you're leaving too much room!"
Retirement Project: '59 Austin A35 2-door with 1330cc Midget engine and many upgrades
Said goodbye: got '98 Alfa Romeo 156 2.0 TSpark to 210K miles before tin worm struck
-
gazza82
- Posts: 422
- Joined: Tue Nov 17, 2015 7:38 pm
- Location: Buckinghamshire
-
Contact:
#97
Post
by gazza82 » Thu Nov 30, 2023 12:10 pm
Having removed the remnants of the old sill and tidied the edges, I've not got to align the new one.
It has a slightly larger gap than I want at the rear under the B-post where it overlaps the old bodywork and there is a gap under the A-post which needs to be sorted. The photo was taken before I moved the sill up a tad to closer to its final resting place.

- 20231129_150159_copy_8160x6120_copy_1324x992_copy_993x744.jpg (193.94 KiB) Viewed 1126 times

- 20231129_151714_copy_1216x1216_copy_912x912.jpg (150.82 KiB) Viewed 1126 times
Once the alignment is sorted I've got to rust-proof the inner sill before it is covered over. And once the car is finished I'll probably spray some waterproofing/rust-preventative into the void (there are some handy drainage holes in the inner sill!)
"If you're driving on the edge ... you're leaving too much room!"
Retirement Project: '59 Austin A35 2-door with 1330cc Midget engine and many upgrades
Said goodbye: got '98 Alfa Romeo 156 2.0 TSpark to 210K miles before tin worm struck
-
Dick
- Posts: 1291
- Joined: Wed Sep 11, 2019 7:31 pm
#98
Post
by Dick » Mon Dec 11, 2023 7:29 am
Did the pliogrip work? Would it work for plastic panels? A mates tractor bonnet support has come unstuck..
-
gazza82
- Posts: 422
- Joined: Tue Nov 17, 2015 7:38 pm
- Location: Buckinghamshire
-
Contact:
#99
Post
by gazza82 » Mon Dec 11, 2023 9:47 am
Dick wrote: ↑Mon Dec 11, 2023 7:29 am
Did the pliogrip work? Would it work for plastic panels? A mates tractor bonnet support has come unstuck..
It's not been tested under road conditions .. as it's still a work-in-progress and a shell ... but I couldn't pull the parts off I used it on - not without damaging the existing metal.
It is basically an epoxy-resin so I don't see any reason why not.
It seems to be very similar to JBWeld though so if you only need a small amount, try that first. Pliogrip only comes in larger canisters similar to diy silicon/caulk and the nozzles are one-use, and about £1 each!, as the epoxy dries hard after a few minutes and clogs them.
I've got a few clogged ones at £2 each!

"If you're driving on the edge ... you're leaving too much room!"
Retirement Project: '59 Austin A35 2-door with 1330cc Midget engine and many upgrades
Said goodbye: got '98 Alfa Romeo 156 2.0 TSpark to 210K miles before tin worm struck
-
gazza82
- Posts: 422
- Joined: Tue Nov 17, 2015 7:38 pm
- Location: Buckinghamshire
-
Contact:
#100
Post
by gazza82 » Thu Dec 14, 2023 11:08 pm
Closed up some of the gap at the rear of the sill at the B-post .. just removing a small section of the end of the upper flange has meant that the sill now sits closer.
Still need to sort the gap under the A-post but as Balrick said "I have a cunning plan!" ... just hoping my plan is more successful that some of Baldrick's!!
I've also removed the lower inner wheel arch seal mounting plates .. these sit on the outer edges and hold a rubber strip against the inside of the wing. The problem is that rubber had cracked and allowed moisture and detritus through and it sits slowly rotting away from the inside. It was spot welded on and has had to be ground off. The edge of the wheel arch behind needs patching as that rust was also behind the seal!
- Nearside ... ahhhh ....
- 20231214_153325_copy_1055x1407_copy_497x663.jpg (242.77 KiB) Viewed 1035 times

- Offside .. not quite as bad!
- 20231214_153453_copy_1024x1365_copy_503x671.jpg (243.64 KiB) Viewed 1035 times
"If you're driving on the edge ... you're leaving too much room!"
Retirement Project: '59 Austin A35 2-door with 1330cc Midget engine and many upgrades
Said goodbye: got '98 Alfa Romeo 156 2.0 TSpark to 210K miles before tin worm struck
Who is online
Users browsing this forum: No registered users and 158 guests