Vulgalour's Vehicles - 10/03 Ignition Switch Woe

Post pictures and stories about your cars both present and past. Also post up "blogs" on your restoration projects - the more pictures the better! Note: blog-type threads often get few replies, but are often read by many members, and provide interest and motivation to other enthusiasts so don't be disappointed if you don't get many replies.
Post Reply
Message
Author
vulgalour
Posts: 674
Joined: Mon Sep 23, 2013 10:28 pm

Re: Austin Morris Princess X2

#51 Post by vulgalour » Fri Oct 04, 2013 5:25 pm

Axles are heavy. I don't know why this keeps surprising me as a thing. In an effort to make the axle easier to move and refurbish I made a concerted effort to strip it down today and found a couple of good reasons beyond prettifying it to do so.

One side was in pretty good order with a decent amount of grease packed into the bearing and the hub nut tightened suitably. The condition of the drum internals this side was also pretty good. The other side, which looked like it had a replacement outer drum as it wasn't painted red like everything else, had no grease packed around the bearing as it should and the hub nut was massively over tightened. On opening the hub on this side it looked like one brake shoe had been replaced but the other hadn't due to one being much more worn than the other and there looked to be a fairly new cylinder.

Because I wasn't sure if the hubs were handed, I made sure to take a couple of reference shots. The metal brake pipes were retained and the unions taped once everything was removed so I didn't get any mess into them. Corrosion is actually very minimal thanks probably to the copious layers of paint that have been applied since '77.
Image

This is the properly maintained hub with even brake shoe wear and a dusty but tidy appearance to everything inside.
Image

I was expecting the nuts and bolts to be fairly stubborn, but either I'm getting better at this or they weren't too bad as the hubs came off in relatively short order, reducing the weight of the axle by about half and making it a lot easier to lug about. I did eventually find a spot that needs welding but given how thick the metal is I expect I can do this with the stick welder I've got to good effect. I managed to shear one of the bolts on this bracket even though everything is well marinaded. I wasn't initially going to remove the arms from the axle but it will make refurbishing everything easier and will mean that there'll be minimum chance of rust returning.
Image

The other side is nice and solid, I gave everything a good stab with the screwdriver.
Image

Once I find the wire brush that's gone walkies I can crack on with refurbishing the bits I've removed while the nuts and bolts on the axle marinate in storage since it's now lightweight enough to actually move to a place that's not outdoors. Providing weather is suitable and I have enough free time, I'll have another go at dismantling the rest of the axle.
mach1rob
Posts: 1787
Joined: Wed Jan 05, 2011 3:22 pm

Re: Austin Morris Princess X2

#52 Post by mach1rob » Fri Oct 04, 2013 8:14 pm

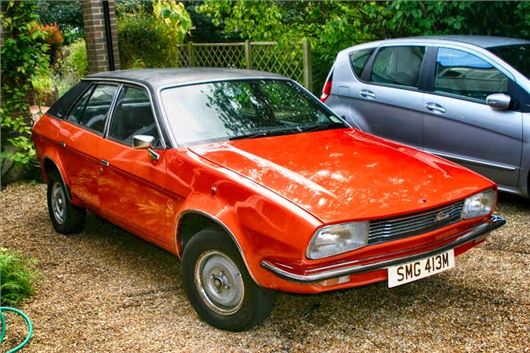
JPB wrote:And don't forget Nick Larkin's Wolseley "Wilson" which I'm almost sure is back in service after his comprehensive recommissioning job. 8-)

Isn't that car the oldest known surviving ADO71?
Was! ;) This M reg mule pre dates it.

Image

User avatar
JPB
Posts: 10319
Joined: Fri Jan 07, 2011 3:24 pm

Re: Austin Morris Princess X2

#53 Post by JPB » Fri Oct 04, 2013 9:46 pm

:drool: :drool: :drool: :drool: It's well worth being wrong when it means we get to see something that shiny as a consequence.

Gimped image, or the world's glossiest wedge?
J
"Home is where you park it", so the saying goes. That may yet come true.. :oops:

vulgalour
Posts: 674
Joined: Mon Sep 23, 2013 10:28 pm

Re: Austin Morris Princess X2

#54 Post by vulgalour » Mon Oct 07, 2013 1:22 pm

I'm led to believe that Princess is just as lovely in person as it is in the picture, gives me something to aim for at least!

---

I was going to update my checklist first with this update, but since I've spectacularly failed to purchase or otherwise acquire a single item on it I deemed there being no point to that particular exercise.

Instead, I've been making a start on a few jobs that wanted doing and I've got more planned to do today. I accidentally worked on Sunday so I'm taking today off in lieu to make up for it otherwise I'll end up working a fortnight without break and that is a Bad Thing.

I finally managed to find a shortcut for getting the shot lacquer off the dash fascia. I've got this weird square cut craft knife blade which has never really been much use until today when I found it could persuade the lacquer to lift from the veneer without causing damage. There were a few stubborn spots that had to be persuaded with sandpaper, but overall it took me probably an hour or two to clean up the fascia back to bare wood. The lacquer that came off had gone cloudy and was obscuring much of the detail of the burr walnut.
Image

A little bit of fill and stain work was required on that chip. Must be something about the design of the dashboard because I've seen a few that have this chip in the same place. I just wanted to make it look less obvious so I've not gone all out trying to mimic wood grain or anything.
Image

With a first coat of varnish on two things were immediately apparent; the first was just how richly hued the veneer is when you can actually see it properly...
Image

... the second was how dry the wood had become where the old lacquer had lifted. It's definitely going to be at least a 3 coat job to get this looking how I want it to but initial signs are promising. You can see where the varnish looks flat and purplish, that's where previously the lacquer had lifted and looked yellow around the edges. There's no evidence of bleaching or staining of the veneer which is comforting so it should look very smart once I've build up a good layer of clear coat.
Image

Another pleasant surprise was the driver's door. There has been a rusty strip poking up from behind the door trim and I'd assumed it was the remnants of the frame where the chrome trim and weather strip clips on. Turns out the rusty bit was actually the remnants of the weather strip itself.
Image

I'm hoping I can get a length of this stuff as all four doors need it replacing. It looks like it might be a universal thing and it has trim clips that hold it to the stainless trim which then pushes onto the door frame. Any ideas where I might purchase this sort of thing?
Image

Some repair work has been done to the frame rail and it's not perfect as some of it is filler and mesh but it seems to have prevented things getting any worse and I should be able to sort this out without replacing the whole door.
Image

The bottom of the driver's door is amazingly solid all things considered. For all I was going to write this door off as being dead it's actually pretty good. The two screws in the door go through the original captive nuts and are correct for the door mirrors. Looks like BL changed the location of the mirror fixings for the final year of production which technically makes the 1981 doors unique to that year as the mirror fixings are differently spaced with captive nuts on the earlier cars.
Image

Likewise, the rear door this side is also in good shape overall. I've removed the door cards to clean them properly and to fit the new regulator I sourced for the driver's door. You can see the incorrect window winder on this door which I'd like to replace with a correct 1981 handle which is similar, though not identical, to Maestro and Montego items.
Image

This is the inside of that door. Could be better but could also be far worse.
Image

Best of all though was yesterday when Dad admitted that the car wasn't worth scrapping or breaking. I'm not sure exactly what changed his mind, whether it was my determination, how much I've managed to improve just by cleaning or whether it was seeing how badly rotten that scrapyard car was, but it was certainly nice to hear.

Topaz
Posts: 246
Joined: Fri Oct 12, 2012 11:52 am
Location: Derby

Re: Austin Morris Princess X2

#55 Post by Topaz » Mon Oct 07, 2013 7:27 pm

vulgalour wrote:. I accidentally worked on Sunday so I'm taking today off in lieu to make up for it
Sorry to go 'off-topic' but I'm a bit puzzled by that comment - how can you accidentally go to work :o :?:

mach1rob
Posts: 1787
Joined: Wed Jan 05, 2011 3:22 pm

Re: Austin Morris Princess X2

#56 Post by mach1rob » Mon Oct 07, 2013 9:10 pm

Weather strip is fairly common

http://www.woolies-trim.co.uk/c-166-weatherstrip.aspx

http://www.rimmerbros.co.uk/Item--i-RT1286 (for a Dolomite, but I can measure the window to compare, but I expect the fronts on yours will be longer with no quarter lights, but they may have some listed for something else that will fit?)

or, I'm not sure if this has a metal strip in or not
http://www.ebay.co.uk/itm/310747779971

Yes, I do need to replace the seal on 1 door as it had been glued on, not clipped like the others.

vulgalour
Posts: 674
Joined: Mon Sep 23, 2013 10:28 pm

Re: Austin Morris Princess X2

#57 Post by vulgalour » Tue Oct 08, 2013 7:09 am

@Topaz: I'm self employed so I work from home. Sometimes, I forget what day it is.

@mach1rob: I don't think the metal is vital to functionality and it'd prevent glass scratches if I did away with it. I don't think the Rimmers item is going to be suitable, the Woolies option looks the best from the links provided. I've been furnished with some links on another forum that I need to compare to.

Topaz
Posts: 246
Joined: Fri Oct 12, 2012 11:52 am
Location: Derby

Re: Austin Morris Princess X2

#58 Post by Topaz » Tue Oct 08, 2013 12:05 pm

vulgalour wrote: I'm self employed so I work from home. Sometimes, I forget what day it is.
Ah! Now I understand - I guess you get into a routine that's hard to break but at least you have that flexibility to take a day off when you need to.

I know that if I went to work on the wrong day I'd find the place all locked up - and as for forgetting what day it, I think we've all been there and done that - as I get older it happens more often - six years to go and then I won't care what day it is :D

Mike

vulgalour
Posts: 674
Joined: Mon Sep 23, 2013 10:28 pm

Re: Austin Morris Princess X2

#59 Post by vulgalour » Wed Oct 09, 2013 5:39 pm

Tiny update, no pictures. Fitted the good regulator on the driver's door of the HLS so that now works properly. The old regulator looks repairable so I'm keeping it because I know one or both cars will need a fettle in a few years since the teeth are quite soft on these things. Fitted the 8 wheel nut covers to one side of the HL and one of them cracked as it was pushed on, which was annoying. Also noticed a few spots under the back of the HL, dipped my finger in it and it was underseal. That seemed a bit weird until I looked at the petrol tank which looks like someone has masked one half off and painted the other half a slightly different colour. Looks like the petrol tank has a leak then, but not a serious one. It's another job to resolve when I drop the axle. The replacement axle is still stewing in penetrating fluid, I've not had time to do anything with it as work has picked up just lately but it can't do any harm to have the fixings soaking for that bit longer. Work on the walnut dash insert for the HLS is progressing nicely too, I'm very pleased with how well that's going.

Pictures at some point, but I thought you might like a mini-update on what's been going on.

vulgalour
Posts: 674
Joined: Mon Sep 23, 2013 10:28 pm

Re: Austin Morris Princess X2

#60 Post by vulgalour » Thu Oct 10, 2013 6:35 pm

Finally, after a temporary weather induced rage quit on my part, I got the axle stripped down to managable chunks ready to be refurbished. The 8 bolts that hold the end brackets onto the cross tube were all seized up so badly that I just resorted to attacking them with the angle grinder which made very short work of them. Fitting new nuts and bolts admittedly adds a little expense and time to the refurb but that's not necessarily a bad thing if I want this to last.

I found another hole on the other side of the bracket that had the bigger hole. This will obviously need repairing and I'm considering dropping off the stripped cross tube with a company that can repair and repaint or powder coat it so it's as good as it can be.
Image

Here you can see why I stood no chance getting those bolts out. These washers have a pair of threaded holes in them that are completely rusted up, the fact I got one bolt out was pretty amazing really when I saw how bad these are. There is some evidence that these were originally spot welded to the cross tube bracket, but none of them were still attached. I'm not sure what my solution here is going to be yet.
Image

I mustn't forget to reinstate washers like this when I do rebuild this bit, wasn't a chance of them surviving when I chopped the heads off the bolts.
Image

First real problem I found was the difference between the mounting brackets. These brackets fit to the ends of the cross tubes and I think they bolt to the underside of the car. They should, as far as I know, be a matching pair but one has half the bracket missing which is probably still attached to the breaker. Not sure how I missed this, but I did. It looks like a very simple bracket so I could probably get a new one made up to match, but how would I then go about bonding it to the rubber mount?
Image

Getting those brackets off is pretty important as it allows you to remove the arms from the cross tube. I haven't attempting to strip the arms down further than they are. I'm concerned that if I damage the bushes in the arms I won't be able to get replacements and rebuild everything, though I'm aware that it's the best way to get rid of all the corrosion and make sure everything goes back together like new.
Image

The only other issue with the HL is that the petrol tank seems to have a minor leak so I need to drop that and find out what's going on. I had hoped it was condensation or something from the car being stood, but water doesn't dissolve underseal and leave little spots of it under the car like petrol does. I'll drop the tank when I drop the axle and do both together. At this rate it's going to be easier to get the HLS on the road, I can see this job with the HL dragging on a bit.

Oh, and the worn window regulator is below. As you can see a good chunk of the teeth have completely the wrong profile to them, probably exacerbated by the stiff operation of the windows on all four doors so I'll be getting some lubrication on the seals to help with that particular issue. The regulator from the breaker looked and operated as though it was a brand new item, which it probably was given the propensity for the teeth on these things to wear away.
Image

Post Reply

Who is online

Users browsing this forum: No registered users and 4 guests