I would probaby annoy Lord Sugar, but I bottled out of repairing the ends of the seatbox. I spent about an hour and a half this morning messing with one of the old floor panels (3mm ally covered with underseal) and only managed to make one repair piece for the vertical bit on the end! As the sides and ends of the seatbox are angled, my easy "rivet some angle in" won't work - and I haven't got a decent metal folder: a 4" vice isn't brilliant and I don't want to bother my former colleagues - especially now my CRB check is out of date - (they only last four or five years and it's nearly five since I left).
The repair panels have been sent via Fed-ex, so should be here tomorrow morning (even with economy post!), so I might get the seatbox repaired, repainted and refitted over the weekend! I'll try to make a start on teh rewiring in the morning - if I get the leads sorted for the starter, I can refit the n/s wing, which will be a better sign of progress than sorting the bulkhead was!
I did manage to get the dashboard top sanded this afternoon and brushed some black "stain" on. I think it may be worth going over the rest of the dash with the stain and then giving it a coat of sealer. If nothing else, it will get rid of some of the faded and stained areas.
A Landy is reborn
-
tractorman
- Posts: 1399
- Joined: Mon Feb 21, 2011 11:22 am
- Location: Wigton, Cumbria
Re: A Landy is reborn
When I had a S3 the dash top was in a pretty sorry state (had been chewed by a dog), I filled the holes with fibreglass then covered it with vinyl, still looked perfect 3 years later when I sold it.
-
tractorman
- Posts: 1399
- Joined: Mon Feb 21, 2011 11:22 am
- Location: Wigton, Cumbria
Re: A Landy is reborn
Sounds about right Kevin; I was/am toying with the idea of doing a similar thing with the lower dash. I had to take the leather-cloth and foam off as the framework is rather rusty and very floppy in places - and someone has made some interesting holes for switches etc. Also, I want to mount a radio and something else on the "parcel shelf" and it's much too narrow. I will use some thin foam and new cloth if I do the job - but the more I look at the old piece of leather-cloth, the less I like it.
Nothing much done today - Fedex haven't even picked the repair panels yet! I got some dye on the dashboard top - and found another split (on the driver's side demister vent) that I cured with superglue and some solvent-free Bostik! That's now ready for some "sealer" and reassembly.
I got the new "live feed" cable made up and in position, which will make life much easier when I come to rewire (the starter is well hidden!) as the main battery feed will be at the top of the bulkhead and things like alternator and heater feeds can come from there. I also remembered to put some seam sealer around the new metal on the bulkhead - it's all too easy to forget such things until you get wet feet!
Re: A Landy is reborn
In my experience you will be lucky to avoid wet feet in an old landie 

Re: A Landy is reborn
I thought all land rovers had a system to keep your shoes clean 
One of the accounts staff I used to work with had a brand new Defender 110 in about 2005/6 and that leaked from the first day she had it.
One of the accounts staff I used to work with had a brand new Defender 110 in about 2005/6 and that leaked from the first day she had it.
Understeer: when you hit the wall with the front of the car.
Oversteer: when you hit the wall with the back of the car.
Horsepower: how fast you hit the wall.
Torque: how far you take the wall with you.
Oversteer: when you hit the wall with the back of the car.
Horsepower: how fast you hit the wall.
Torque: how far you take the wall with you.
-
tractorman
- Posts: 1399
- Joined: Mon Feb 21, 2011 11:22 am
- Location: Wigton, Cumbria
Re: A Landy is reborn
True, but I usually wore wellies when driving them!kstrutt1 wrote:In my experience you will be lucky to avoid wet feet in an old landie
The worst car we had for letting water in was one of Father's "winter cars" (he bought old bangers when the doctor stopped him riding his motor bike in winter), a Triumph 1300 that, when he bought it, we noticed the blanking plugs were lying on the parcel shelf and put them back in the floor. A few days later I was driving on a wet road and there was a nice water jet onto my right leg! The blanking plugs were removed to let a good inch of water out of the footwell/floor!
It wasn't a bad car otherwise - a new rear wheel cylinder and, IIRC, a doughnut on the o/s driveshaft and a second hand tyre (which had been left on when the garage sprayed a wheel silver) and that was it for four or five months (till the MOT expired).
-
tractorman
- Posts: 1399
- Joined: Mon Feb 21, 2011 11:22 am
- Location: Wigton, Cumbria
Re: A Landy is reborn
Not much progress this week, due to all sorts of holdups.
The new sides for the seatbox arrived quickly enough: the lad said they had arrived at Carlisle on Friday - I got them on Monday morning. I made a start on a battery tray in the bottom of the n/s seat "toolbox" and ran out of "pop" rivets within a very short time! I have plenty of countersunk ones (for the tub floor), but only eleven ordinary ones. I ordered a hundred on eBay and they arrived yesterday - the tray is finished, though I want some straps below it (I made those yesterday) and I used forty rivets for the job!
In an atempt to reduce the galvanic corrosion, I etch primed the tray and straps last night and, before going to town this morning, painted some smooth Hammerite (very old but unopened tin). I was out for an hour and a half and the paint was still wet when I got home - it's a bit cold outside today! I eventually brought the seatbox indoors at four o'clock and set it beside the Rayburn (it's great being a single occupant!) and the paint was dry by five!
The wiring diagram for the Prima conversion that I found on the net isn't suitable for my engine. There's at least one relay missing and I can only guess that the post-EGR engines are slightly different to the pre-EGR ones (though the Haynes "Monego Diesel" manual only shows minor differnces. However, the net's diagram doesn't show any fusing on the heater plug circuit, so I hadn't bought any fuses or holders (the lad who did the conversion wasn't an electrical expert - barely a novice to look at some of the wiring!). I ordered on Wednesday night and they arrived on Friday morning (along with a rubber mat to put in the tub - after trimming it to size).
I want to integrate the Land Rover and Montego wiring diagrams - for the next owner (eventually!) as much as anything - having had some interesting work when trying to sort the wiring on the Landy. My CAD packages on the Win 7 machines won't play ball with bitmap stuff and, after remembering that the old Win 98 laptop hasn't got much other than Office and various electronics programming stuff, I dug out my copy of Autosketch (V6) that won't offer to load in Win7 (in compatible mode or otherwise), so tried that. Then remembered that I have Windows Draw that was an excellent bit of software untl Corel bought the firm who made it and ruined three bits of easy-to-use software! Five mintues with that produced some satisfying results - now to get the motivation to sort the wiring diagrams themselves! Yep, i remembered that Tetris is on the old machine - one morning wasted!
-
tractorman
- Posts: 1399
- Joined: Mon Feb 21, 2011 11:22 am
- Location: Wigton, Cumbria
Re: A Landy is reborn
I've managed to stall things again and still haven't got the machine running (and hence, it's still in the garage). I have more or less finished the seatbox's repairs and modifications, though I could only get white stonechip (aerosol - they only had one can) at Euro Car Parts the other day, so it looks a bit odd!
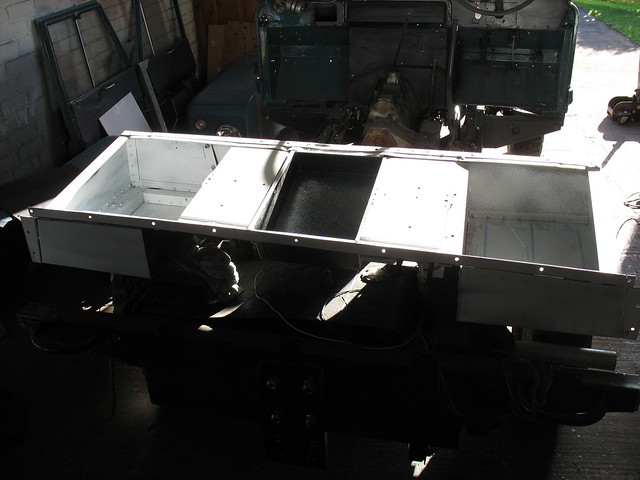
Sorry about the poor photo - the sun was shining brightly this morning!
There's an improved battery tray (mentioned in the last post) that needs something to hold the battery in place; a centre tray to go under the centre seat (or an armrest if I can be bothered to make one) and a new box under the driver's seat. The new side panels went in well (with a lot of pop rivets) and it's ready to be fitted now. It was time the battery tray was sorted though: the weight of the unsecured battery bouncing around had broken most of the spot welds that held the base of the tool box onto the front and side of the seatbox!
I remembered that I had to change the GL5 oil in the gearbox, so drained that and put GL4 in while the covers were off - it's a lot easier that way! While thinking about that, I also remembered that there's a brake pipe to change when I put the new brake pedal (etc) on - and it goes along the top of the chassis and under the seatbox. The original copper pipes were cobbled up to fit the Defender servo and I suspect that they will let go if I try to bend them again! With the foresight that I usually lack, I thought it might be wise to change the hoses while I am messing with the pipes (I think the front pipes are in a similarly work-worn condition), so ordered a set of stainless hoses before the seatbox has been fitted!
The Landy threw it's usual metaphorical spanner in the works though - I was going to make a new strip for the wing to radiator frame bolts and discovered that the frame has decided to come apart on one side. While I was taking the frame off, I remembered that the (Montego) radiator mounting was another half-cocked affair: a piece of ally angle bolted to the wing on one side and the frame on the other. It is now a bit shorter and lower and bolted on one side to the mounting for the steering relay on the LHD version. If I had some longer bolts, the other side would be mounted on the steering relay's mounting, but it will have to be mounted to one of the battery tray supports (though the battery tray isn't there now). Lack of time - and the neighbour wanting some furniture moving - stalled the job!
-
tractorman
- Posts: 1399
- Joined: Mon Feb 21, 2011 11:22 am
- Location: Wigton, Cumbria
Re: A Landy is reborn
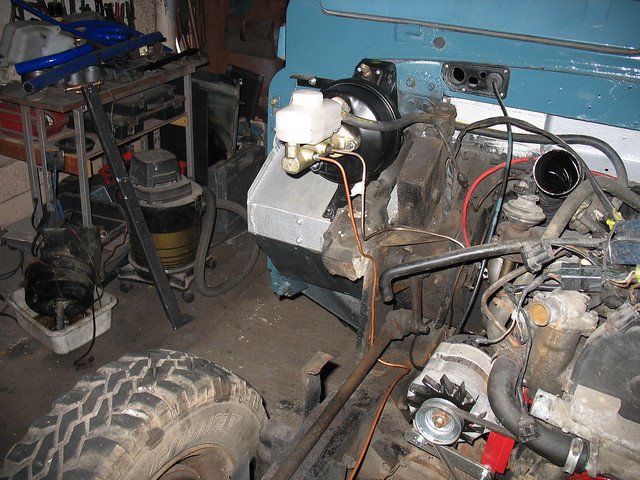
OK, I didn't notice that I hadn't used the IMG button!
Though, as I said, it's a poor photo!
I managed to get a slightly better photo of the front end, with new radiator mount bolted to the steering's idler mount (for LHD versions). I have never liked a lot of overweight metal being used to do a job that a much smaller piece can do the job - so the 3mm thick angle iron across the width of the chassis had to go and two four-inch long bits were used instead! I might have got away with some ERW box that is somewhere in the scrap pile, but the old angle iron was more convenient!
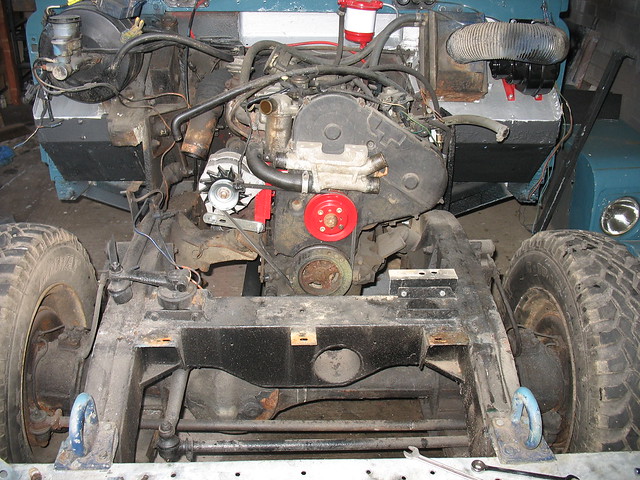
That was Saturday's work and I was going great guns on the bracket for the other side (the 4" x 1/4" bolts came on Saturday) when I came to unbolt the idler, there were two lengths of 8mm threaded rod holding it in place. I found two 4" x 5/16" bolts in one of the "bolt trays" and they were soon used for the RH bracket! If I'd checked on Thurdsay, I'd have fitted the bracket on Friday, so two days lost! To those who may be concerned, there are bolts between the brackets and the angle iron, so the idler won't move if the bracket pulls it's lock-nut off and there shouldn't be any excessive strain on the bolts!
I flushed the radiator and was pleased to see that there was very little muck coming out. I suspect that's because most of it came out and into the bowl that I was using to try and stop the coolant flooding the garage floor!
To be more exact, three days lost: Phil turned up and wanted to use the welder to repair a keyboard stand for a member of his band (his welder is hidden somewhere!), so I spent two hours helping him out, though half an hour was searching for a spring that he lost!
Though, as I said, it's a poor photo!
I managed to get a slightly better photo of the front end, with new radiator mount bolted to the steering's idler mount (for LHD versions). I have never liked a lot of overweight metal being used to do a job that a much smaller piece can do the job - so the 3mm thick angle iron across the width of the chassis had to go and two four-inch long bits were used instead! I might have got away with some ERW box that is somewhere in the scrap pile, but the old angle iron was more convenient!
That was Saturday's work and I was going great guns on the bracket for the other side (the 4" x 1/4" bolts came on Saturday) when I came to unbolt the idler, there were two lengths of 8mm threaded rod holding it in place. I found two 4" x 5/16" bolts in one of the "bolt trays" and they were soon used for the RH bracket! If I'd checked on Thurdsay, I'd have fitted the bracket on Friday, so two days lost! To those who may be concerned, there are bolts between the brackets and the angle iron, so the idler won't move if the bracket pulls it's lock-nut off and there shouldn't be any excessive strain on the bolts!
I flushed the radiator and was pleased to see that there was very little muck coming out. I suspect that's because most of it came out and into the bowl that I was using to try and stop the coolant flooding the garage floor!
To be more exact, three days lost: Phil turned up and wanted to use the welder to repair a keyboard stand for a member of his band (his welder is hidden somewhere!), so I spent two hours helping him out, though half an hour was searching for a spring that he lost!
-
tractorman
- Posts: 1399
- Joined: Mon Feb 21, 2011 11:22 am
- Location: Wigton, Cumbria
Re: A Landy is reborn
The seatbox is black again - I'm going on the theory that half an inch of paint on every panel will limit galvanic corrosion! I've sorted out the centre panel (what would be the radiator mounting etc) and it's ready for refitting whenever I get the radiator and pipework sorted (as well as a heater valve and air bleed valve that weren't fitted before).
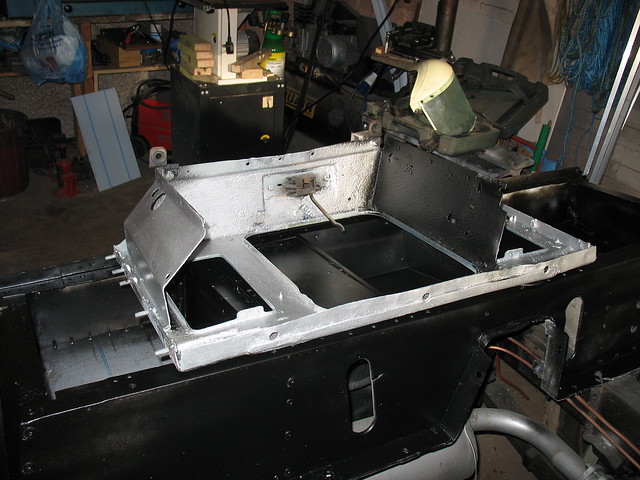
You can also see signs of winter in the background: kindling on the bandsaw!
As there is a delay with some of the pipes and fittings for the cooling system and as one of the brake pipes goes below the radiator, I thought it may make sense to change the brake pedal box/servo/master cylinder etc. It would only be a five minute job to get the old one out and ten minutes to put the new one in. I hadn't thought that the steering box would cause problems - five minutes to remove the old unit, two hours to fit the new one! There's a taper to the front of the box that just fouls the steering box. I won't show the photo of how I moved the steering box up by about 3mm - it involves a scissor jack on several blocks of wood - and a long bit of 3x2!
I half expected to need to change a pipe or two. OK, I knew I wanted new pipes from the master cylinder to replace the much modified copper ones. However, I only have three original pipes left at the moment (and one of those needs to be changed) - two are the link pipes between the pairs of front wheel cylinders. I have been lucky so far - three of the pipes between the hoses and wheel cylinders came out of the cylinders without stripping the threads! The last pipe to change (from o/s of rear axle to n/s rear wheel cylinder) might come off easily - but I won't put money on it! I've been spraying the unions and bleed nipples with penetrating oil, so I'm living in hope that I won't have similar problems to the ones I had with my Rover 60 (about forty years ago) - I ended up spending a fortune on new pipes and wheel cylinders and still had problems with leaks!
New pipes have been made for the master cylinder, though the end of the "front" pipe hasn't been decided yet (it goes into a new tee). I bought ready made copper pipes to go between the tee and the front wheels - all the old ones were well twisted by the time they were removed. I've only got enough pipe left for the back brakes - and I need at least five unions (and only have three!), so that job is on hold for now!
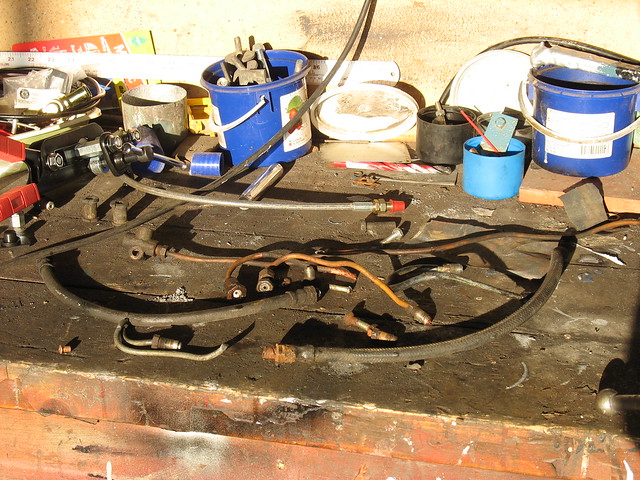
I'll leave you to guess which photo is of the old pipes and which is of the new stuff! Annoyingly, the old tee on the back axle has worn threads - the unions were rusty right down to the bottom of the threads! I had hoped I would just have to fit the hose to the tee - but no such luck! And no, I haven't forgotten that the new pipes need to be "fixed" to the body - I haven't got that far yet! I need to work out where the front tee needs to be and then I can fit the front pipes (and put clips on the ones from the master cylinder).
As the pipe to the back is in place, I can fit the seatbox and get it out of the way! However, I think I will leave that until the pipes have been sorted on the back axle - just in case I need the extra space.
Sorting the brakes reminds me that I want to put new seals on the "spheres" on the front axle (where the CV joints would be on a FWD car). It seems sensible to do that job before fitting the brake pipes and bleeding the system. So it looks like the Landy will be in the garage for another week or two!
You can also see signs of winter in the background: kindling on the bandsaw!
As there is a delay with some of the pipes and fittings for the cooling system and as one of the brake pipes goes below the radiator, I thought it may make sense to change the brake pedal box/servo/master cylinder etc. It would only be a five minute job to get the old one out and ten minutes to put the new one in. I hadn't thought that the steering box would cause problems - five minutes to remove the old unit, two hours to fit the new one! There's a taper to the front of the box that just fouls the steering box. I won't show the photo of how I moved the steering box up by about 3mm - it involves a scissor jack on several blocks of wood - and a long bit of 3x2!
I half expected to need to change a pipe or two. OK, I knew I wanted new pipes from the master cylinder to replace the much modified copper ones. However, I only have three original pipes left at the moment (and one of those needs to be changed) - two are the link pipes between the pairs of front wheel cylinders. I have been lucky so far - three of the pipes between the hoses and wheel cylinders came out of the cylinders without stripping the threads! The last pipe to change (from o/s of rear axle to n/s rear wheel cylinder) might come off easily - but I won't put money on it! I've been spraying the unions and bleed nipples with penetrating oil, so I'm living in hope that I won't have similar problems to the ones I had with my Rover 60 (about forty years ago) - I ended up spending a fortune on new pipes and wheel cylinders and still had problems with leaks!
New pipes have been made for the master cylinder, though the end of the "front" pipe hasn't been decided yet (it goes into a new tee). I bought ready made copper pipes to go between the tee and the front wheels - all the old ones were well twisted by the time they were removed. I've only got enough pipe left for the back brakes - and I need at least five unions (and only have three!), so that job is on hold for now!
I'll leave you to guess which photo is of the old pipes and which is of the new stuff! Annoyingly, the old tee on the back axle has worn threads - the unions were rusty right down to the bottom of the threads! I had hoped I would just have to fit the hose to the tee - but no such luck! And no, I haven't forgotten that the new pipes need to be "fixed" to the body - I haven't got that far yet! I need to work out where the front tee needs to be and then I can fit the front pipes (and put clips on the ones from the master cylinder).
As the pipe to the back is in place, I can fit the seatbox and get it out of the way! However, I think I will leave that until the pipes have been sorted on the back axle - just in case I need the extra space.
Sorting the brakes reminds me that I want to put new seals on the "spheres" on the front axle (where the CV joints would be on a FWD car). It seems sensible to do that job before fitting the brake pipes and bleeding the system. So it looks like the Landy will be in the garage for another week or two!
Who is online
Users browsing this forum: No registered users and 165 guests