Post pictures and stories about your cars both present and past. Also post up "blogs" on your restoration projects - the more pictures the better! Note: blog-type threads often get few replies, but are often read by many members, and provide interest and motivation to other enthusiasts so don't be disappointed if you don't get many replies.
-
Grumpy Northener
- Posts: 1637
- Joined: Sun Apr 03, 2011 8:26 am
- Location: Hampshire UK
#351
Post
by Grumpy Northener » Mon Apr 13, 2015 10:07 am
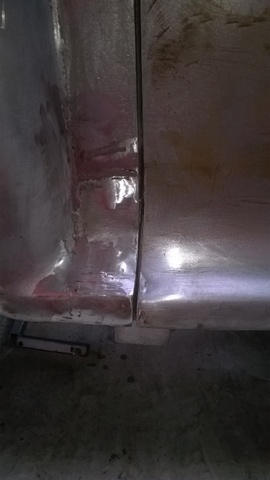
Onwards a bit further - Keith had fitted the O/S/R wing prior to the restoration show but I was far from happy with alignment against the door

- WP_20150412_003-001.jpg (56.9 KiB) Viewed 3528 times
I needed to get the wing lower in order to match the lower curvatures of the door

- WP_20150412_004-001.jpg (48.63 KiB) Viewed 3528 times
There is a chrome trim that masks the wing aperture line so I just packed the wing down with some washers on a temporary basis

- WP_20150412_007-001.jpg (51.58 KiB) Viewed 3528 times
Which gave me the required alignment
- WP_20150412_006-001.jpg (47.35 KiB) Viewed 3528 times
1937 Jowett 8 - Project - in less pieces than the Jupiter
1943 Jowett Stationary Engine
1952 Jowett Jupiter - In lots of peices
http://Jowett.org/
1952 Jowett Javelin - Largely original
1973 Rover P6 V8 - Original / 22,000 miles
-
Grumpy Northener
- Posts: 1637
- Joined: Sun Apr 03, 2011 8:26 am
- Location: Hampshire UK
#352
Post
by Grumpy Northener » Mon Apr 13, 2015 10:28 am
Now Rich requested a tutorial on lead loading so here goes - Lead loading is the old school method for making up shallow areas in panel work - going back 40 - 50 years it would have been used by all vehicle manufactures to fill seam lines / panel joints etc over where a final paint finish would have been applied - they had no polyester / catoly / 2 pack fillers available in those days. Restorers still use it today - it gives a more original repair - the vast majority still use a good quality polyester filler to achieve a final profile over the lead but this is just a fine skimming and not a bucket load !

- WP_20150412_009-001.jpg (53.5 KiB) Viewed 3524 times
First you need a clean bare metal surface - free of rust / dust / paint etc - lead loading is purely to make the depression / shallow area up - it is not be used for the filling of rust perforated holes or structural repairs

- WP_20150412_010-001.jpg (53.62 KiB) Viewed 3524 times
Paint on a good quality solder paste - this is a solder bound flux - it's not cheap but its good - only cover a area of say 150mm x 150mm at a time (cover more and you will find that the paste has dried out with the heat before you get to it)

- WP_20150412_011-001.jpg (59.5 KiB) Viewed 3524 times
Then with a suitable narrow flame (you can just see the blue flame to the left of the picture - you could use a standard blowtorch but you need a fine nozzle / tip for it - use a wide flame and you will have no end of problems) Carefully heat a small area of the solder paste until it fluxes - you need a well ventilated area - don't apply too much heat or you will begin to distort the panel - has the paste fluxes and the solder starts to run - remove the heat and wipe the fluxed area clean with a damp cloth - take care not to wipe off the rest of the solder paste that you have yet to heat - working methodically complete the process in sections until you have tinned the area that you wish to lead load

- WP_20150412_014-001.jpg (51.99 KiB) Viewed 3524 times
Should look like this once you have the area tinned - I will post the next steps when I return home a little later today
1937 Jowett 8 - Project - in less pieces than the Jupiter
1943 Jowett Stationary Engine
1952 Jowett Jupiter - In lots of peices
http://Jowett.org/
1952 Jowett Javelin - Largely original
1973 Rover P6 V8 - Original / 22,000 miles
-
Grumpy Northener
- Posts: 1637
- Joined: Sun Apr 03, 2011 8:26 am
- Location: Hampshire UK
#353
Post
by Grumpy Northener » Mon Apr 13, 2015 5:00 pm
Next step is load the lead to the panel

- WP_20150412_015-001.jpg (62.43 KiB) Viewed 3508 times
This is body solder - available from several outlets - or you can buy a lead loading kit has a starter pack

- WP_20150412_016-001.jpg (57.89 KiB) Viewed 3508 times
Then apply the lead - heat the stick not the panel - just enough heat to get the stick to soften - too much heat and it will just become too fluid and run down the panel - I heat the tip of the stick and keep turning it over every few seconds - a little pressure on the stick will help - you need to break away sections of the stick and get them on to the panel in dabs / dots at spaced intervals - don't worry about shape or how it looks for now - If you are attempting this for the first time choose a flat panel / horizontal surface like the top of a wing or if its a door remove it from the car and it lay flat on a bench or workmate and attempt the smaller repair areas whilst you gain confidence - I have picked the most awkward panel possible - large area of multiple compound curvatures over a vertical panel - if you have the car on a chassis tilter you could angle the car to more workable angle rather than a sheer vertical face

- WP_20150412_017-001.jpg (65.69 KiB) Viewed 3508 times
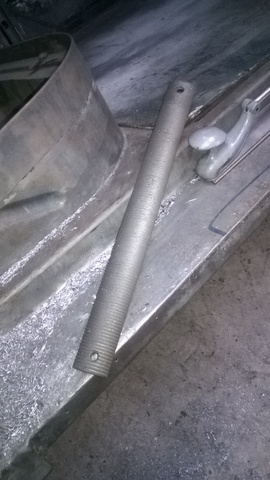
Lead loading paddles - normally beech or maple they are different types for achieving different shapes - if you are handy with woodwork you could make your own but they are relatively cheap (usually £7 - £10 each) Tallow is what is used for preventing the lead sticking to the paddle face and be seen to the lower of the image with the flat paddle
- WP_20150412_018-001.jpg (54.37 KiB) Viewed 3508 times
Carefully heat the lead on the panel - don't heat the panel - it will distort and your lead will run off the panel - just enough heat to soften the lead - work in small areas at a time - use the paddle with slight pressure to push / spread the lead over the repair area - keep adding a little tallow to the paddle this will help when working the lead - work from the bottom of the panel upwards - this prevents the tallow running onto the areas where you have yet to work the lead - you are not looking for a perfect flat surface - just work it so that you achieve a loose profile of the panel - if you overload the panel then you create more work for yourself - too little and you will still have a depression that you will have add further lead to. Over the larger areas it is not unusual to have load the area a couple of times - best skill to have is good hand to eye coordination - you need to learn when the lead is just soft enough - and to move the heat away at the right time whilst also reapplying the heat at the right time.
1937 Jowett 8 - Project - in less pieces than the Jupiter
1943 Jowett Stationary Engine
1952 Jowett Jupiter - In lots of peices
http://Jowett.org/
1952 Jowett Javelin - Largely original
1973 Rover P6 V8 - Original / 22,000 miles
-
Grumpy Northener
- Posts: 1637
- Joined: Sun Apr 03, 2011 8:26 am
- Location: Hampshire UK
#354
Post
by Grumpy Northener » Mon Apr 13, 2015 5:17 pm
Ok once you have the lead roughly into shape you will need to wash the tallow off the lead before attempting to shape it - I use panel wipe but any spirit based product will do - once clean you start shaping - there is no reason why you cannot remove the tops / rough with a flap wheel fitted to an angle grinder but please wear the correct personal protection

- WP_20150412_023-001.jpg (66.66 KiB) Viewed 3506 times
Anything less than this little lot and you will not be doing your health any favours

- WP_20150412_024-001.jpg (64.65 KiB) Viewed 3506 times
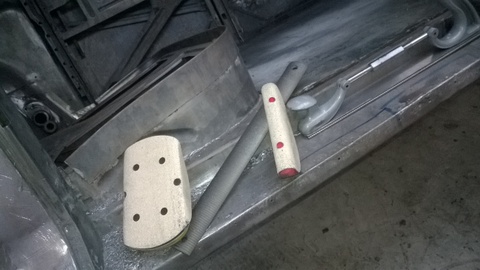
This is a body file and is just the tool for the job - it can be adjusted to be flat / concave / convex dependant upon the panel profile - just work it in a forwards motion and it will soon indicate any high / low spots in the work area

- WP_20150412_030-001.jpg (53.24 KiB) Viewed 3506 times
Still some way off yet but with some additional work it will soon be in profile
- WP_20150412_028-001.jpg (68.74 KiB) Viewed 3506 times
I also have a rigid radius bodyfile the internal curvatures
1937 Jowett 8 - Project - in less pieces than the Jupiter
1943 Jowett Stationary Engine
1952 Jowett Jupiter - In lots of peices
http://Jowett.org/
1952 Jowett Javelin - Largely original
1973 Rover P6 V8 - Original / 22,000 miles
-
Grumpy Northener
- Posts: 1637
- Joined: Sun Apr 03, 2011 8:26 am
- Location: Hampshire UK
#355
Post
by Grumpy Northener » Mon Apr 13, 2015 5:32 pm
Has the profile forms you can hand block with either 60 / 80 grade production paper
- WP_20150412_029-001.jpg (65.01 KiB) Viewed 3503 times
You could also use an orbital sander to finish off if required but again please remember the personal protection kit (I don't want any of you falling over from lead poisoning)

- WP_20150412_032-001.jpg (51.97 KiB) Viewed 3503 times
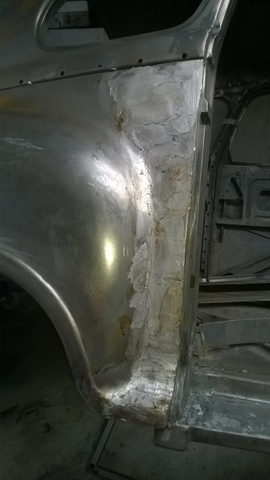
It's important to keep checking apertures and the profiles with adjoin panels - the difference in steel / lead areas becomes obvious has you work the area

- WP_20150412_034-001.jpg (57.24 KiB) Viewed 3503 times
The shallow areas shown in the image shall be reloaded with lead to bring the area flush

- WP_20150412_035-001.jpg (56.22 KiB) Viewed 3503 times
But nearly there ! Once you have completed an area you will notice surface / flash rust start to form within the surrounding areas due to the powerful flux that you have been using - don't be alarmed by this - just complete the rest of your lead loading then redress the surface areas by rubbing back with production paper or a orbital sander. Immediately prior to paint I use a rust conversion product called 'Fertan'
http://www.fertan.co.uk/Item-Fertan%20r ... verter.htm which resolves any surface rust issues. So there you go - appears to be a lot of work / faff - but the job gets done properly with a lasting repair and not two buckets of polyester filler. I use this company for my body solder / lead supplies - they do starter kits - attend most of the major shows but will also post out goods
http://www.lb-restoration.co.uk/cgi-bin ... mmerce.cgi1937 Jowett 8 - Project - in less pieces than the Jupiter
1943 Jowett Stationary Engine
1952 Jowett Jupiter - In lots of peices
http://Jowett.org/
1952 Jowett Javelin - Largely original
1973 Rover P6 V8 - Original / 22,000 miles
-
Grumpy Northener
- Posts: 1637
- Joined: Sun Apr 03, 2011 8:26 am
- Location: Hampshire UK
#356
Post
by Grumpy Northener » Tue Apr 14, 2015 7:12 am
Couple more images taken by one of my fellow JCC members of works progress on the car
![20150412_174255 _360x640_[1]-001.jpg](./download/file.php?id=3286&sid=0353cf8a5416dcb969cb104fd45a1d0b)
- 20150412_174255 _360x640_[1]-001.jpg (101.36 KiB) Viewed 3484 times
Leadwork
![20150412_153057 _640x360_[1]-001.jpg](./download/file.php?id=3287&sid=0353cf8a5416dcb969cb104fd45a1d0b)
- 20150412_153057 _640x360_[1]-001.jpg (94.45 KiB) Viewed 3484 times
Dent / shallow removal by use of spot welded studs which are then drawn back by a slide hammer great for accessing double skinned or inaccessible panels
1937 Jowett 8 - Project - in less pieces than the Jupiter
1943 Jowett Stationary Engine
1952 Jowett Jupiter - In lots of peices
http://Jowett.org/
1952 Jowett Javelin - Largely original
1973 Rover P6 V8 - Original / 22,000 miles
-
rich.
- Posts: 6804
- Joined: Wed Jan 05, 2011 9:18 pm
#357
Post
by rich. » Tue Apr 14, 2015 3:51 pm
thanks mate!

you make it look easy
-
Grumpy Northener
- Posts: 1637
- Joined: Sun Apr 03, 2011 8:26 am
- Location: Hampshire UK
#358
Post
by Grumpy Northener » Sun Apr 19, 2015 10:27 pm
1937 Jowett 8 - Project - in less pieces than the Jupiter
1943 Jowett Stationary Engine
1952 Jowett Jupiter - In lots of peices
http://Jowett.org/
1952 Jowett Javelin - Largely original
1973 Rover P6 V8 - Original / 22,000 miles
-
vulgalour
- Posts: 674
- Joined: Mon Sep 23, 2013 10:28 pm
#359
Post
by vulgalour » Mon May 04, 2015 7:06 pm
What's lead loading like for mess? Compared to the sanding you have to do on polyester fillers, it always seems really tidy and much less hassle to clean up after when you're doing a big job. Really informative to see some in progress shots of lead loading, each person I've seen do this does it the same way and totally differently, if that makes sense?
-
Grumpy Northener
- Posts: 1637
- Joined: Sun Apr 03, 2011 8:26 am
- Location: Hampshire UK
#360
Post
by Grumpy Northener » Mon May 04, 2015 10:59 pm
What's lead loading like for mess? Compared to the sanding you have to do on polyester fillers, it always seems really tidy and much less hassle to clean up after when you're doing a big job. Really informative to see some in progress shots of lead loading, each person I've seen do this does it the same way and totally differently, if that makes sense?
Very little mess is created whilst lead loading - I normally have a catch tray under my work area when loading up - the shaping back creates a little more debris - but this is heavy so falls straight to the floor unlike the polyester fillers which just put dust everywhere. Has for undertaking the lead loading it's a little like spraying we all have our own ways - some will start at the top and work down - others at the bottom & work up it's all down to individual technique really.
1937 Jowett 8 - Project - in less pieces than the Jupiter
1943 Jowett Stationary Engine
1952 Jowett Jupiter - In lots of peices
http://Jowett.org/
1952 Jowett Javelin - Largely original
1973 Rover P6 V8 - Original / 22,000 miles
Who is online
Users browsing this forum: No registered users and 21 guests
