Morris 10M

Post pictures and stories about your cars both present and past. Also post up "blogs" on your restoration projects - the more pictures the better! Note: blog-type threads often get few replies, but are often read by many members, and provide interest and motivation to other enthusiasts so don't be disappointed if you don't get many replies.
Message
Author
User avatar
Luxobarge
Posts: 1900
Joined: Wed Jan 05, 2011 3:12 pm
Location: Horne, Surreyshire

Re: Morris 10M

#31 Post by Luxobarge » Mon Nov 07, 2011 11:13 am

Loving this thread - keep up the good work, you have a lovely car there.

Remember, just because you don't get any/many replies in the thread doesn't mean we're not all enthralled by the story!

Cheers :D
Some people are like Slinkies - they serve no useful purpose, but they still bring a smile to your face when you push them downstairs.

User avatar
JPB
Posts: 10319
Joined: Fri Jan 07, 2011 3:24 pm

Re: Morris 10M

#32 Post by JPB » Mon Nov 07, 2011 11:24 am

Indeed it does not. I'm watching and enjoying too. Proper job! :)
J
"Home is where you park it", so the saying goes. That may yet come true.. :oops:

tractorman
Posts: 1399
Joined: Mon Feb 21, 2011 11:22 am
Location: Wigton, Cumbria

Re: Morris 10M

#33 Post by tractorman » Mon Nov 07, 2011 2:00 pm

+1 (or two or three)

Great stuff and not overdone like some classics I've seen - the fact that the Austin is a daily driver (or very nearly so) makes it even more interesting.

User avatar
vintagemotor
Posts: 278
Joined: Fri Sep 23, 2011 3:19 pm
Location: wouldn't you like to know

Re: Morris 10M

#34 Post by vintagemotor » Mon Nov 07, 2011 8:11 pm

Luxobarge wrote:Lovely car - more like this please! :D :D :D
Totally agree :)
“It is not the critic who counts; not the man who points out how the strong man stumbles, or where the doer of deeds could have done them better. The credit belongs to the man who is actually in the arena"

TWOTENS
Posts: 51
Joined: Mon Feb 21, 2011 9:18 pm

Mission Creep

#35 Post by TWOTENS » Mon Dec 05, 2011 8:47 pm

I was quite amazed, on originally removing the head from the engine, that it appeared to have standard bores, with little in the way of a wear ridge, and so, was not altogether surprised to see, when having dropped the sump and the first bearing caps from the conrods, that there was no evidence of a regrind there either. Quite how a sixty odd year old car comes to have an apparently unmolested engine, albeit with a worn out head, is a mystery. I can only assume that there has been a transplant at some time in its life, with the older head being put onto a new short motor. Perhaps when I have time, I will investigate engine numbers.
Anyway, Plan A was to replace valves and guides, drop out the pistons, replace the rings and stick in some new big end shells. The shells themselves were not bad, just one starting to pick up slightly and signs of the copper backing just starting to show, but nothing serious. The journals were okay , but one or two had a sort of blue stain upon them, as if they had overheated.
I pondered for a while and then decided that life would be simpler, long term, if I lifted the block out of the car, and removed the crank, making a clean out of the crankcase and reinsertion of the pistons (from below on one of these engines) an easier job. Of course once I had done this, then it would be sensible to look at the main bearings too (and the clutch and the timing chain!!!).
With a hired hoist standing by, I detached the rest of the ancillaries and lugged the engine out.
Main bearings were passable, but borderline.
Well, after all this work it would be criminal to reassemble with new shells without a grind, and so off the crank has gone now, for a first regrind and new shells.
In the meantime, the head has come back and sits awaiting reassembly, and I have taken the time to do some tidying up around the engine bay. I have also ordered an XPAG oil filter assembly, modified to take a modern cartridge, which should preserve my handiwork a little longer. Hopefully everything will come back by Christmas and I can retire to the garage and quietly reassemble whilst the family sleeps off the festive excesses.
Meanwhile the poor old Morris looks a little bereft with most of its front end removed.
Attachments
DSCF1758.JPG
DSCF1758.JPG (54.42 KiB) Viewed 1355 times

User avatar
JPB
Posts: 10319
Joined: Fri Jan 07, 2011 3:24 pm

Re: Morris 10M

#36 Post by JPB » Mon Dec 05, 2011 11:31 pm

Shells? Is this a conversion or were these that advanced when first built? (Even the A-series didn't have replaceable shells until the 948 came along, hence my surprise at this).
J
"Home is where you park it", so the saying goes. That may yet come true.. :oops:

TWOTENS
Posts: 51
Joined: Mon Feb 21, 2011 9:18 pm

Re: Morris 10M

#37 Post by TWOTENS » Tue Dec 06, 2011 2:10 pm

Morris were quite advanced in engineering terms in the late 1930’s, and the X series of engines were also used in the famous T series MG sports cars, Y Series saloons and some of the smaller Wolseleys as well as the Series M Morris 10 that was reintroduced after the Second World War. The engines have similarities to the A series, OHV, with replaceable shell bearings and an oil filtration system that includes a disposable external canister.
In the immediate years prior to the war, Austin, their nearest rival were still on 'in sump' filtration via a mesh strainer, and directly white metalled conrod bearings, as well as being sidevalve based.
Morris, for some reason, returned for a while to sidevalve engines in the earlier Minors.

User avatar
Luxobarge
Posts: 1900
Joined: Wed Jan 05, 2011 3:12 pm
Location: Horne, Surreyshire

Re: Morris 10M

#38 Post by Luxobarge » Tue Dec 06, 2011 2:57 pm

TWOTENS wrote:Morris, for some reason, returned for a while to sidevalve engines in the earlier Minors.
That's because Issigonis originally designed the Minor to have a flat-four engine, a la Jowett Javelin. That's why he designed torsion bar suspension, to give maximum room (particularly width) in the engine bay, and why the bonnet has a central "hump" to allow for carb and air cleaner on top of the engine. However, Mr. Morris was getting a bit hide-bound and reactionary in his old age, and this was a step too far for him, so he didn't allow Issigonis to do it. That left them needing an engine in a hurry, and the only one that would fit was the old side-valve from the Morris 8 - which was by then pretty under powered even by the standards of the day, and was woeful in the Minor, thought by many to spoil an otherwise excellent car. It was only the merger of Morris and Austin to form BMC in 1954 (?) that saved the Minor, as it gave them immediate access to the A-series, which of course the Minor used ever after.

So it wasn't really out of choice that they hung on to the sidevalve in the early minor, it was of necessity!

Makes you think what an awesome car the minor would have been if Issigonis had had his way and fitted a flat four.

For this reason I think some folk have fitted Minors with Subaru engines - but then Minors have been fitted with just about every engine imaginable over the years, nonetheless the idea of a flat four does appeal, at least in terms of its historical significance.

[/trivia]

Now, back to this most excellent restoration..... ;)

Cheers!
Some people are like Slinkies - they serve no useful purpose, but they still bring a smile to your face when you push them downstairs.

TWOTENS
Posts: 51
Joined: Mon Feb 21, 2011 9:18 pm

Re: Morris 10M

#39 Post by TWOTENS » Thu Dec 29, 2011 12:49 am

Its been a couple of weeks since I last posted and most of this time has been spent cleaning components and buying and waiting for new (plus of course Christmas). I have also had the crank reground and new shells sourced and finally have come to the more enjoyable part of the process where one can start to reassemble things. The only missing piece in the jigsaw is a new spin on filter adaptor to replace the old and now unobtainable disposable canister unit, which I have ordered from Peter Edney MG Spares, but has yet to materialise.

First came the installation of the engine onto a stand to make it easier to manipulate. I had never used one before, and had been a little wary due to the limited number of bolt fixings available and their small diameter. However, browsing the internet showed plenty of MG owners slinging their almost indentical XPAGs onto cantilever stands, and I decided to be brave. This gave me chance to clean out a couple of additional areas, and then assembly could start.

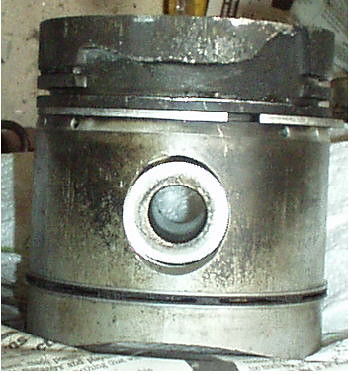
First came the fitting of the NOS Cords rings to the pistons. A good clean out of the grooves is essential and then they fit relatively easily. The lower two are spring steel scrapers assembled in four 'layers' and whilst long winded, in terms of getting each section the right way up, at least as spring steel components they are very forgiving, unlike traditional cast iron rings which are prone to breakage if not handled correctly. The upper two are cast, the very top one being stepped to avoid any wear ridge on the bore.
It was then necessary to do some glaze busting on the bores. There are lots of schools of thought about this. Some favour the old fashioned way with elbow grease and emery cloth, others a high tech honing tool which attaches to your power drill and is run up and down the bore to break the carbonised glaze that can stop your rings bedding in. Some say this is essential, others that it a myth and both sides of the argument can produce reams of testimony upholding their views. Given my desire to only do the job once, I decided to deglaze.....carefully.
Two things struck me. Firstly the power tool attachments seemed a touch savage to my eye and since the idea is to remove the lacquer on the surface of the metal rather than the metal itself , I was wary of an unfamilar tool that might do some real harm. Secondly there seems to be a lot of confusion between whether these attachments are for honing a raw rebored cylinder wall to give it a more appropriate surface texture, or whether they are for the gentler task of scraping off and texturing a layer of old carbonised oil.
I decided to go for emery cloth, and made up a hand tool out of foam pipe lagging with the abrasive taped around the outside. After adjusting the diameter by slicing layers out of the slot used to allow it to be slipped over a pipe. I got a suitable fit into the bore that allowed me to rotate and pull and push up and down each cylinder to abrade the glaze. A spray of WD40 before and a pull through with a rag afterwards, to remove the debris and all appears okay.
DSCF1772comp.jpg
Whats this? A simple home made tool for deglazing a bore without losing your knucles.
DSCF1772comp.jpg (48.8 KiB) Viewed 1397 times
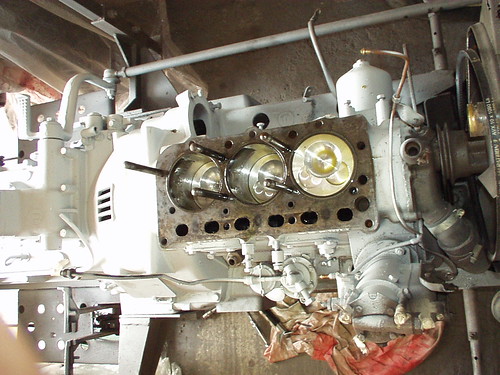
Next comes the refittng of the crank and bearings. The centre bearing on all of the X Series engines does not have a thrust washer as such, but has a white metalled shell bearing with a shoulder each side, which needs fitting when the crank is reground, since it too is oversized by the same amount as the journal has been ground down, if you follow what I mean.

The need to fit this was flagged up in an excellent article by Neil Cairns on a mechanically similar MG Y Type saloon on the Y Register website (see the following link)

http://www.mgccyregister.com/node/19058

Ian is a few steps ahead of me but the XPAG is so similar to my cooking XPJM, that it has been an excellent tutorial to follow, and a lot more explicit than the Workshop Manual, which is very Haynes like in its descriptions and totally fails to mention the need to 'fit' the centre main bearing at all. Ian also has a lot of hints on priming a newly assembled engine with oil, which will be invaluable before too long.
Pistons and crankshaft in tomorrow...but first I must buy a new piston ring compressor!
Attachments
DSCF1771comp.jpg
Engine on its stand with new main bearing shells trial fitted. Interestingly, although the outside of the engine has been painted black, with no evidence of it having been any other colour....the insides are painted red. I have stuck to black externally with a coat of matt black HR paint, and blue for the chain cover and fan, replicating what was already there. Rocker cover is silver, but maybe should be blue as well.
DSCF1771comp.jpg (66.11 KiB) Viewed 1305 times
Last edited by TWOTENS on Sat Dec 31, 2011 9:23 pm, edited 2 times in total.

tractorman
Posts: 1399
Joined: Mon Feb 21, 2011 11:22 am
Location: Wigton, Cumbria

Re: Morris 10M

#40 Post by tractorman » Thu Dec 29, 2011 11:03 am

Glad to see more pics - and that someone is working in a cold garage at this time of year!

Re the glazebuster, I'd agree that they can be aggressive and a friend used one to clean up a Ford 1500 engine some years ago. The engine (in a speedboat) had been under a leaking roof, water had got into one of the cylinders and the bore was a little rusty. So he stripped it down and glazebusted until the bore was smooth. The engine hasn't run properly since - in fact he bought another engine to replace it and that hasn't been fitted either! I fear it spelt the end of the boat - it's been outside for about fifteen years as he bought a couple of Jet-Skis - that he hardly uses as they keep breaking down!

The trick is not to use it as a reboring tool! Use a slow setting on the drill and only go up and down a "couple" of times - and use plenty of oil! I have one that I used on my smaller tractor about five or six years ago (a piston went "bad" and it lost its rings!) and have had no problems with it since. Or, to be more exact, I've had no problems with the engine since!

Image

Don't worry - I haven't lost a cylinder!

Image

Post Reply

Who is online

Users browsing this forum: No registered users and 6 guests