Morris 10M
Re: Morris 10M
Fordson dexta?
-
tractorman
- Posts: 1399
- Joined: Mon Feb 21, 2011 11:22 am
- Location: Wigton, Cumbria
Re: Morris 10M
Nah, it isn't a Perkins engine (Ford actually had a special version of the Perkins 3-pot engine made for the Dexta). It's a David Brown, the finest 3-pot diesel bar none (OK, I'm biased, but DB were one of the pioneers in agricultural diesel engines). Unlike Perkins, they are block bored (no liners at all when made) and, in spite of being about 40 years old when the piston blew, it still didn't need reboring!
See my "story":
http://www.practicallyclassics.co.uk/vi ... =12&t=2519
I might have gone for a classic car but, apart from lack of space, I'm not the most enthusiastic welder or body repairer and couldn't afford a good one! Never mind, in another eleven years, my Golf will be a classic
See my "story":
http://www.practicallyclassics.co.uk/vi ... =12&t=2519
I might have gone for a classic car but, apart from lack of space, I'm not the most enthusiastic welder or body repairer and couldn't afford a good one! Never mind, in another eleven years, my Golf will be a classic
Re: Morris 10M
Further engine rebuilding progress.
The crankshaft fitting went well, the machine shop had fettled the centre bearing which needed no attention and the initial fit of the crank with its caps in place did not reveal the dreaded lock up. I then removed it all again, and fitted the pistons from below, which again, went well. There are two schools of thought for X series engine piston fitting. Fitting from the top is not possible because the big end journal is larger than the piston, due to it being a long stroke engine. The choice is either to fit up the rings and then insert from the crankcase, using your compressor and the small taper on the cylinders' bottom rim, or push the piston up through, sans rings and then fit rings and push back down again with compressor. The latter is probably the way to go if you are fitting with the crank in place and have rebored so that there is no evidence of a wear step in the top of the cyinder. I did it the first way.
Bearing shells and caps went on easily, but torquing them up and then moving them on a partial turn to allow alignment of the castellated nuts and the split pin holes was a little nerve racking!
Fitted a new timing chain, amazing how much the original had stretched.Then on with the sump, (oil pickup etc.previously assembled) and the front timing chain cover.
Finally, with the engine rotated upright, I put in around 4 litres of supermarket 20:50 oil and wound the engine round on the handle until the oil pump was primed and oil came out of the disconnected outlet pipe. The X series are famous for being reluctant to suck oil up into the system on first startup after a rebuild, and you are advised to prime as far as possible, turning by hand and eventually by starter motor, but without ignition on, until you are satisfied that the system is up to pressure. Quite a few XPAG rebuilds have been ruined by failure to recognise this. Today, after some priming with an oil can here and there, I managed to wind the oil as far as the pump outlet.
The filter and feed will go on when the engine is in place, and then further priming will take place before we turn the ignition on for a first startup.
A bit more building up on the head tomorrow prior to fitting and then its back into the car with the whole lump, early next week.
I'll keep you posted.
- Attachments
-
- Sump in place. Quite tricky fittings around rear cork seal
which is totally invisible once sump is offered up, and front pulley seal,
where alignment of timing case cover and front end of sump is crucial to getting a good oil tight fit.
Not surprisingly, many X Type engines leak copiously from front and rear sump seals. - DSCF1773 (2).JPG (12.65 KiB) Viewed 2173 times
-
- Engine upright, Funnel is to allow sump to be filled down gaps alongside cam followers.
- DSCF1775.JPG (13.14 KiB) Viewed 2173 times
-
- Freshly painted chain cover in blue. Have picked out timing pointer in white to
make it more visible to a strobe timing light. - DSCF1772 (2).JPG (11.42 KiB) Viewed 2173 times
Last edited by TWOTENS on Sun Jan 01, 2012 11:23 pm, edited 1 time in total.
Re: Morris 10M
Forgot to mention that the oil filter turned up on Wednesday as well.
Re: Very Close....
Nearly there now after a few odd excursions. Generally everything went together quite well and the remote oil filter assembly turned up and after a pause for painting, was fitted.
Then it was onto the engine crane again, and in. However, could I get the two halves to mate up again? After an afternoons grunting, shoving, twisting and wedging, I gave up and dropped the engine back onto the garage floor.
Thinking about it overnight, I decided that with only a couple of bolts holding the gearbox into place, and with the transmission tunnel already removed to give some access to the bellhousing bolts, I would drop out the box, fit it to the block on the floor and then sling the whole lot back in one piece. This I duly did, the two units slipped back together with a satisfying clunk and we were back in business.
With the combined engine and gearbox back in the car, the next to be tackled was the head and after cleaning up the studs and giving the whole lot a final wipe down with a clean cloth, back it went with a new head gasket, followed by carb, exhaust and linkages.
Now it was time to prime everything a little further/ You'll remember the old XPAG problem of getting the oil back around the oilways after overhaul, and my initial reprime of the oil pump. Time now to go a step further and fill up the filter cartridge, before screwing it up into its housing and then winding the engine over on the handle once more until it squirts out of the union to the main oil gallery. In theory now, we have oil flow right into the main oil feed to the bearings.
After final assembly is complete, but with plugs out and ignition off, I spin her on the starter motor. After a pause the oil gauge starts to climb and then we have 30lbs/ sq in showing, indicating that the pump has managed to shove oil up the feed pipe to the dash, and therefore, it is a reasonable supposition that its has found its way into most other places.
Finally the radiator. This means a reassembly of the front bodywork, so on goes the combined cowl and radiator assembly, and temporarily, the side panels to make sure that everything fits.
Hoses are a bit of a nightmare on these, and I refitted everything that had come off, but really, we need a new main top house and a small section of side hose. These are not easy to come by, and so, working on the possibility that something might have to come apart again anyway, I put it back together as is and tightened up the clips.
Initial top up with water, showed a couple of leaks and the clips were tightened further and then a more vigorous attempt to fill up showed a more fundamental problem, my guess as to the 'off' position of the radiator drain tap was wrong and I was standing in a pool of water!!
Quite why it didn't come out first time is anyone's guess, possibly because the car is still nose up on the ramps.
The plan this weekend was therefore, to have a first startup, and then reassemble the interior, if all was well.
Alas the sun shone, and the Austin, which I'd left in the garage over Christmas due to the lousy weather, was shouting to be driven, so on Saturday, I got out the handle, wound her around a few times and then went for a rural drive for the afternoon.
And today....well it was bitterly cold, and after a little tinker here and there, and a couple of jobs on my daughter's Citroen C1, I decided to postpone the maiden run until the weather warms up a little later in the week.
More soon.....
Then it was onto the engine crane again, and in. However, could I get the two halves to mate up again? After an afternoons grunting, shoving, twisting and wedging, I gave up and dropped the engine back onto the garage floor.
Thinking about it overnight, I decided that with only a couple of bolts holding the gearbox into place, and with the transmission tunnel already removed to give some access to the bellhousing bolts, I would drop out the box, fit it to the block on the floor and then sling the whole lot back in one piece. This I duly did, the two units slipped back together with a satisfying clunk and we were back in business.
With the combined engine and gearbox back in the car, the next to be tackled was the head and after cleaning up the studs and giving the whole lot a final wipe down with a clean cloth, back it went with a new head gasket, followed by carb, exhaust and linkages.
Now it was time to prime everything a little further/ You'll remember the old XPAG problem of getting the oil back around the oilways after overhaul, and my initial reprime of the oil pump. Time now to go a step further and fill up the filter cartridge, before screwing it up into its housing and then winding the engine over on the handle once more until it squirts out of the union to the main oil gallery. In theory now, we have oil flow right into the main oil feed to the bearings.
After final assembly is complete, but with plugs out and ignition off, I spin her on the starter motor. After a pause the oil gauge starts to climb and then we have 30lbs/ sq in showing, indicating that the pump has managed to shove oil up the feed pipe to the dash, and therefore, it is a reasonable supposition that its has found its way into most other places.
Finally the radiator. This means a reassembly of the front bodywork, so on goes the combined cowl and radiator assembly, and temporarily, the side panels to make sure that everything fits.
Hoses are a bit of a nightmare on these, and I refitted everything that had come off, but really, we need a new main top house and a small section of side hose. These are not easy to come by, and so, working on the possibility that something might have to come apart again anyway, I put it back together as is and tightened up the clips.
Initial top up with water, showed a couple of leaks and the clips were tightened further and then a more vigorous attempt to fill up showed a more fundamental problem, my guess as to the 'off' position of the radiator drain tap was wrong and I was standing in a pool of water!!
Quite why it didn't come out first time is anyone's guess, possibly because the car is still nose up on the ramps.
The plan this weekend was therefore, to have a first startup, and then reassemble the interior, if all was well.
- DSCF1783cmp.jpg (239.4 KiB) Viewed 2118 times
And today....well it was bitterly cold, and after a little tinker here and there, and a couple of jobs on my daughter's Citroen C1, I decided to postpone the maiden run until the weather warms up a little later in the week.
More soon.....
- Attachments
-
- 14012012178comp Jan 2012.jpg (199.98 KiB) Viewed 2118 times
Ignition!
Well, it has taken all this time for a maiden run.
I realised when I set the ignition timing again, that the distributor was somewhat out of kilter from its original position with TDC on number 1 cylinder. This, since the camshaft and drive had not been disturbed, should not have been the case, and when I turned the starter, well, hardly any signs of life at all. Coincidentally, the big freeze set in and I retired to my fireside with the workshop manual and began to wonder if I had lost the valve timing.
I decided to open her up again, and sure enough, I had picked up the marked links on the chain, but had then forgotten that the chain itself was divided by the marked links into two uneven segments....and put it in with the gear wheel markings in the wrong place, ie about six links out from the intended timing.
Last weekend, with the temperature back above freezing, I set to and put everything back together, and tonight added water and oil, reset the timing and pressed the button. The oil pressure went up to 25 as we cranked, so I was happy that it had primed itself again (X series engines are notorious for their reluctance to pick up oil after a strip down). I turned the ignition back on and after a few spits and a bit of choke, she spun into life. 50lbs per sq in came up on on the oil pressure gauge and I kept her going on a little bit of throttle for a couple of minutes then shut down.
She needs a new top hose (the old one leaks at the bottom joint, all its resiliance gone) and there are a couple of drips from the external oil plumbing, but on Saturday, I will give her 30 minutes on a fast idle to let all the rubbish burn off and then let her cool down and have a good tighten up.
Re: Morris 10M
This is a great thread that I have throughly enjoyed reading.
Great work on the car and posting the story!
Great work on the car and posting the story!
Re: Morris 10M
Back again.
A bad back and then work pressure have kept me off here for a few months, but the project hasn't all been at a standstill.
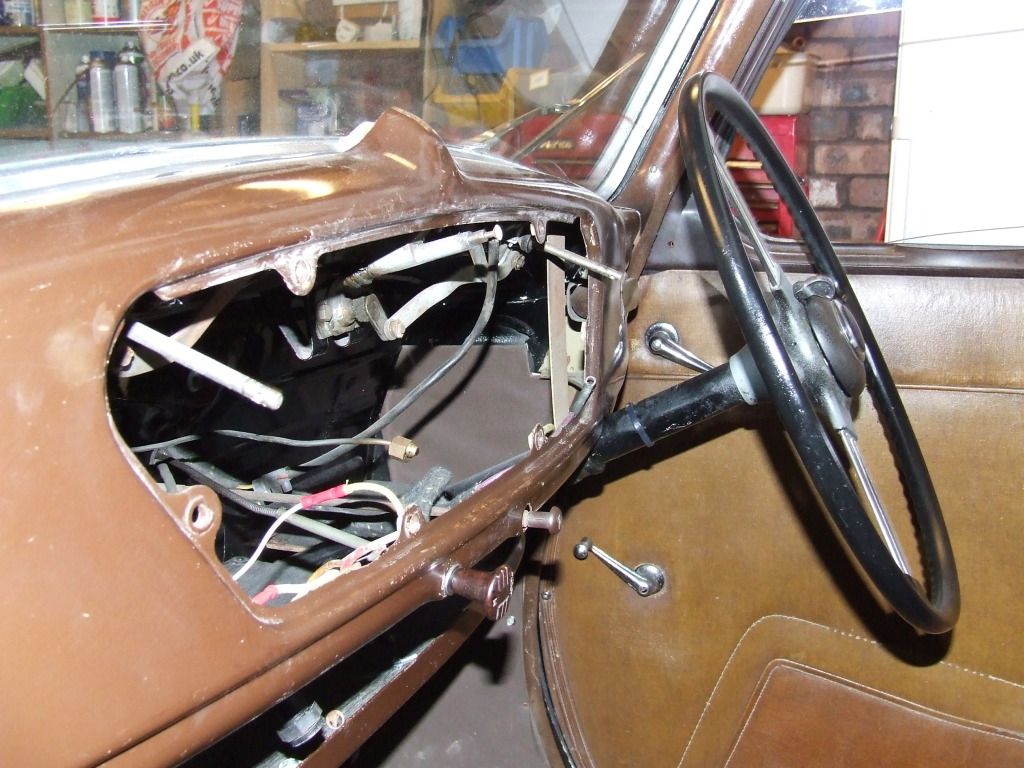
Attention has now gone to the interior, mainly the upholstery. The front seats were in a poor state, the material worn through to the backing (not leather but something called Rexine) and so these have been removed and sent off for recovering. The back seats were okay, so I have left them for the moment.
So whilst I have some fighting space inside the car, I will have a go at a general tidy up. The headlining needs a tidy up along the top of the windscreen (no sun visors either, and it does not appear from sales literature of the day that these were fitted) and the dash is scruffy with a rust pitted instrument panel. I have already cleaned up the steering wheel and sealed the rim with some Rustoleum black, which gives a good impression, thus far, and I have removed the surface rust from the gear lever. I have my eyes open for a good Morris gearknob as well, the one in place comes from an older 3 Speed car.
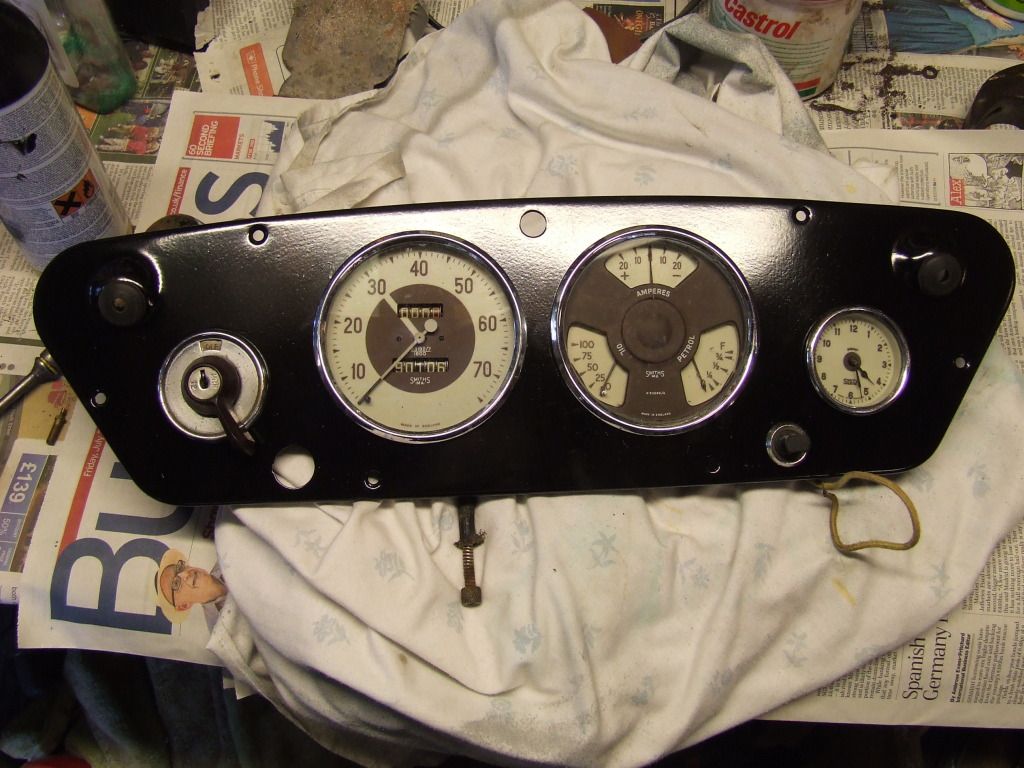
This weekend I have also stripped out all the instruments for a good clean up and have removed the central instrument panel for a rub down and a coat of paint.
Other things to be done:
Door trims, not sure really, the carpet strip on the bottoms is falling to pieces , so those will be changed, but apart from some local wear, they are in passable nick. I might wait until the seats come back and see what the overall impression is like before, I do too much more.
Externally, I am still looking for the trim strip between the bonnet mascot and the top of the grille, but I have managed to find a decent Morris Ten winged emblem for the boot lid. I will also fit flashing indicators, before we hit the road properly.
Will I get it on the road before the deadline for MOT exemption passes?
A bad back and then work pressure have kept me off here for a few months, but the project hasn't all been at a standstill.
Attention has now gone to the interior, mainly the upholstery. The front seats were in a poor state, the material worn through to the backing (not leather but something called Rexine) and so these have been removed and sent off for recovering. The back seats were okay, so I have left them for the moment.
So whilst I have some fighting space inside the car, I will have a go at a general tidy up. The headlining needs a tidy up along the top of the windscreen (no sun visors either, and it does not appear from sales literature of the day that these were fitted) and the dash is scruffy with a rust pitted instrument panel. I have already cleaned up the steering wheel and sealed the rim with some Rustoleum black, which gives a good impression, thus far, and I have removed the surface rust from the gear lever. I have my eyes open for a good Morris gearknob as well, the one in place comes from an older 3 Speed car.
This weekend I have also stripped out all the instruments for a good clean up and have removed the central instrument panel for a rub down and a coat of paint.
Other things to be done:
Door trims, not sure really, the carpet strip on the bottoms is falling to pieces , so those will be changed, but apart from some local wear, they are in passable nick. I might wait until the seats come back and see what the overall impression is like before, I do too much more.
Externally, I am still looking for the trim strip between the bonnet mascot and the top of the grille, but I have managed to find a decent Morris Ten winged emblem for the boot lid. I will also fit flashing indicators, before we hit the road properly.
Will I get it on the road before the deadline for MOT exemption passes?
Re: Morris 10M Dashboard
Here are a couple of pictures of the dash stripped out. Original colour was a strange sort of gold painted finish, which I haven't seen replicated on any photographs of similar cars. Most seem to get painted black, so maybe the gold is something that a previous owner has done. Instruments have cleaned up well and the new paint and a good clean of the chrome rims and glass fronts to the instruments works wonders for how things look.

Re: Morris 10M
Great thread and a great resto - keep it up!
Cheers
Cheers
Some people are like Slinkies - they serve no useful purpose, but they still bring a smile to your face when you push them downstairs.
Who is online
Users browsing this forum: No registered users and 167 guests